Tuesday, May 3, 2022

FM Transmitter 75 to 108MHz using BA1404 IC with PCB

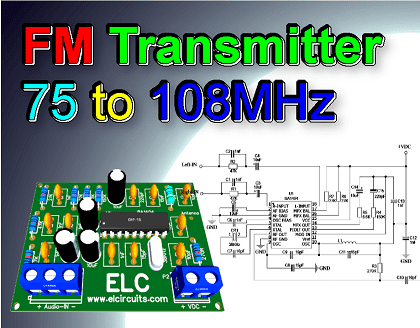
Fig. FM Transmitter 75 to 108MHz using BA1404 IC with PCB

Build Your Own FM Transmitter: Step-by-Step Guide with BA1404 IC & PCB

This is a Stereo FM Transmitter, based on the BA1404 Hi-Fi Integrated Circuit, which is a stereo FM modulator that creates composite stereo signals, with low consumption, maximum 3mA, and an operating voltage between 1.5 to 2V.

The FM modulator has carriers in the FM transmission band (75~108MHz). It develops signals composed of a MAIN signal (L+R), a SUB signal (L-R) and a pilot signal (19KHz) using 38KHz crystal oscillators.

Feature

  • Available in DIP18 and SOP18 packages
  • Low operating voltage range (1.0V ~ 2V)
  • Low power consumption, typically 3mA
  • Requires few external components

Applications

  • FM stereo Transmitters
  • Wireless Microphones
  • FM PLL Oscillator 

ATTENTION!

For each Country, Region, State... There are Laws on broadcasting, telecommunications, audio and video transmission, etc.

Do not use telecommunications equipment without authorization from the entities responsible for transmitting Radio Frequencies.

Electronic Circuits teaches electronics applied to various segments, with the aim of improving knowledge, we do not support or take responsibility for any type of illegal operation.

For any operation with RF, we recommend looking for the competent regulatory agencies, seeking certification and/or legalization.

The transmitter circuit

The schematic diagram of the FM Transmitter 75 to 108MHz using BA1404 IC, is shown in Figure 2 below, it is a simple circuit to assemble, there are few external components to solder, however it is a circuit of great quality and stability.

Fig. 2 - Diagram Schematic FM Transmitter 75 to 108MHz using BA1404 IC

The Coil

The L1 coil is a Model 750A3.5T Inductor, however, you can make your own inductor by winding 3 to 4 turns of 24 AWG copper wire, or 0.5 mm diameter copper wire, into a 5 mm diameter ferrite core.

The Antenna

The antenna can be used with a telescopic antenna purchased at electronics stores, if you don't have it, you can use approximately 30cm of rigid wire, which will work perfectly.

Component List

  • Semiconductors
    • CI1 ...... BA1404 Integrated Circuit
  • Resistors
    • R1, R2 .... 47KΩ resistor (yellow, violet, orange, gold)
    • R3 ........... 270Ω resistor (red, violet, brown, gold)
    • R4 ........... 150KΩ resistor (brown, yellow, green, gold)
    • R5 ........... 5.6KΩ resistor (green, blue, red, gold)
    • R6, R7 .... 27KΩ resistor (red, violet, orange, gold)
  • Capacitors
    • C1, C2, C6, C12, C13 .. 1nF Ceramic Capacitor
    • C3, C4, C5, C14 .......... 10uF 16V Electrolytic Capacitor
    • C7, C10 ....................... 10pF Ceramic Capacitor
    • C8, C9, C11 ................. 15pF Ceramic Capacitor
    • C15 .............................. 220pF Ceramic Capacitor
  • Inductor
    • L1 ......... 750A3.5T Inductor *see text
  • Cristal
    • CR1 ...... 38KHz Cristal
  • Miscellaneous
    • P1, P2 .... Screw Terminal Type 5mm 2-Pin Connector
    • ANT1 .... Telescopic Antenna *See Text
    • Others .... Printed Circuit Board, tin, wires, etc.

The PCB - Files to Download

In Figure 3, we provide the PCB - Printed Circuit Board, in GERBERPDF and PNG files. These files are available for free download, on the MEGA server, in a direct link, without any bypass. 

All to make it easier for you to do a more optimized assembly, either at home, or with a company that prints the board. You can download the files in the Download option below.

Fig.3 - PCB FM Transmitter 75 to 108MHz using BA1404 IC

Files to download, Direct Link:

Click on the link beside: GERBER, PDF and PNG files

I hope you enjoyed it!!!

If you have any questions, suggestions or corrections, please leave them in the comments, and we will answer them soon.

Subscribe to our blog! Click Here - elcircuits.com!

My Best Regards!

Wednesday, April 27, 2022

2.5KM FM transmitter, using transistor 2N3866 with PCB

Fig. 1 - 2.5KM FM transmitter, using transistor 2N3866 with PCB

Ultimate Guide: Building a Powerful 2.5KM FM Transmitter with 2N3866 Transistor and PCB

This is a simple FM transmitter, with great range, being able to reach more than 2.5 km of distance, using a suitable antenna, powered by a power supply or a 12Vdc battery.

The circuit has a frequency range that can be tuned between 88 and 108 MHz, and is quite stable, and can be used for small audio transmission links, or as community radio, and with great audio quality.

The Transmitter

The FM - Frequency Modulated transmitter circuit is a wireless device that operates in a high frequency range.

It can transmit audio signals to the atmosphere through electromagnetic waves, and can be received by an FM receiver circuit tuned to the same frequency as the transmitter, to reproduce signals from; songs, voice, musical instruments, etc. on the FM receiver.

ATTENTION!

For each Country, Region, State... There are Laws on broadcasting, telecommunications, audio and video transmission, etc.

Do not use telecommunications equipment without authorization from the entities responsible for transmitting Radio Frequencies.

Electronic Circuits teaches electronics applied to various segments, with the aim of improving knowledge, we do not support or take responsibility for any type of illegal operation.

For any operation with RF, we recommend looking for the competent regulatory agencies, seeking certification and/or legalization.

Characteristics!

  • High sensitivity of audio pickup
  • 12V to 16Vdc supply voltage
  • Simple circuit to assemble
  • Great range, about 2.5km
  • Easy assembly

Circuit Operation

The circuit uses two RF transistors; Q1 2N2218 used as RF oscillator, and transistor Q2 2N3866, used for power stage.

The decouple electrolytic capacitor C1, receives the audio signal, who comes from a signal source, which can be a soundboard, a USB audio card, a musical instrument, or any other signal source.

This modulated signal is sent to the base of transistor Q1, it works as an oscillator circuit, the trimmer VC1 in parallel with the coil L1, adjusts the circuit operating frequency.

Transistor Q2 works as the power stage of the transmitter, it amplifies the RF signal generated by Q1, and sends it to the output, composed by the antenna.

Trimmers VC2 and VC3 connected to the antenna, adjust the impedance of the antenna coupled to the output, which we must adjust for better impedance matching, and to obtain the best signal at the output.

Applications!

  • Audio transmitter
  • Audio link for instruments
  • Wireless microphones
  • Spy Microphone
  • Homemade FM radio

Schematic diagram

The schematic diagram of the 2.5 km FM Transmitter is in Figure 2 below. As we can see, it is a very simple circuit, however, it is not recommended for those who have no experience with electronic circuit assembly. 

It is recommended to mount this circuit in a metal box, if you do not have a metal box, glue aluminum foil on the walls of the box to shield the entire circuit from external interference.

Fig. 2 - Schematic 2.5KM FM transmitter, using transistor 2N3866

Circuit Adjustments 

The transmitter frequency adjustment, is regulated through the CV1 trimmer, and the CV2 and CV3 trimmers, to regulate the antenna impedance matching, must be done with patience for a better use.

The coil L1, L2 and L3 must be made with enameled wire 22 AWG of 1 cm in diameter with air core, the number of turns is described in the component list.

L4 is a 10uH RF shock, and you could be building your own RF shock by winding 15 vols of thin enamel wire around a 1MΩ resistor, soldering to both ends of the copper wire, at each end of the resistor.

The antenna can be a length of rigid wire between 20 and 50 cm for short ranges, or use a 1/2 wave dipole antenna for long ranges.

The Power Supply

The power source can be from 12Vdc to 16Vdc, if a power supply is used, well filtered sources must be used, due to the sensitivity of the circuit.

Don't use large wires, always use short wires, and shield the transmitter circuit source. The current consumed by the circuit is around 120mA when powered by 12V, and 400mA when powered by 16V.

Components List

  • Semiconductors
    • Q1 .............  2N2218 or 2N2219 NPN transistor
    • Q2 .............. 2N3866 or 2N4427 NPN Transistor 

  • Resistors
    • R1, R2 ....... 10KΩ 1/4W Resistor (brown, black, orange, gold)
    • R3 .............  47Ω 1/4W Resistor (yellow, violet, black, gold)
    • PT1 ........... 10KΩ Potentiometer 

  • Capacitors
    • C1 .............  2.2uF /16V Electrolytic Capacitor
    • C2, C3 ....... 1nF Ceramic/Polyester Capacitor
    • C4, C5 ....... 8.2pF Ceramic Capacitor
    • VC1, 2, 3 ... 0 ~ 47pF Trimmers

  • Coils
    • L1 ............... 4 Turns, 7mm diameter Inductor
    • L2 ............... 3 Turns, 7mm diameter Inductor
    • L3 ............... 5 Turns, 7mm diameter Inductor 
    • L4 ............... RFC -  10uH Inductor *See Text

  • Miscellaneous
    • P1, P2 .... Screw Terminal Type 5mm 2-Pin Connector
    • Other ........................... PCB, Wires, Speaker, etc.

PCB - Printed Circuit Board

In Figure 3, we provide the PCB - Printed Circuit Board, in GERBER, PDF and PNG files. These files are available for free download, on the MEGA server, in a direct link, without any bypass. 

All to make it easier for you to do a more optimized assembly, either at home, or with a company that prints the board. You can download the files in the Download option below.

Fig. 3 - PCB - 2.5KM FM transmitter, using transistor 2N3866

Files to download, Direct Link:

Click on the link beside: GERBER, PDF and PNG files

I hope you enjoyed it!!!

If you have any questions, suggestions or corrections, please leave them in the comments, and we will answer them soon.

Subscribe to our blog! Click Here - elcircuits.com!

My Best Regards!

Wednesday, April 6, 2022

14V 4 Channel 200W MOSFET Quad Bridge Power Amplifier using TDA7850 with PCB

Fig. 1 - 14V 4 Channel 200W MOSFET Quad Bridge Power Amplifier using TDA7850 with PCB

Unleash Power and Sound with a 14V 4-Channel 200W MOSFET Quad Bridge Amplifier using TDA7850 and PCB

This is a 14V 4 Channel 200W MOSFET Quad Bridge Power Amplifier, it uses an TDA7850 Integrated Circuits, in Quad Bridge Mode to drive four power speakers.

The circuit provides a total output power of 200W, and this with good sound quality, powered from a unipolar 14V power supply.

The Amplifier responds very well to all audible frequency ranges, and has a minimalist, compact design, which makes this amplifier a good choice for an unprecedented range of application. 

IC Description

The TDA7850 is a breakthrough MOSFET technology Class AB audio power amplifier in Flexiwatt 25 package designed for high power car radio. 

The fully complementary P-Channel / N-Channel output structure allows a rail to rail output voltage swing which, combined with high output current and minimized saturation losses sets new power references in the car-radio field, with unparalleled distortion performances. The TDA7850 integrates a DC offset detector.

You might also be interested in:

IC Features

  • High output power capability:
    • 4 x 50W / 4Ω max.
    • 4 x 30W / 4Ω @ 14.4 V, 1 kHz, 10 %
    • 4 x 80W / 2Ω max.
    • 4 x 55W / 2Ω @ 14.4V, 1 kHz, 10 %
  • MOSFET output power stage
  • Excellent 2Ω driving capability
  • Hi-Fi class distortion
  • Low output noise
  • ST-BY function
  • Mute function
  • Auto mute at min. supply voltage detection
  • Low external component count:
    • Internally fixed gain (26 dB)
    • No external compensation
    • No bootstrap capacitors
  • On board 0.35 A high side driver

The Schematic Circuit

In Figure 2 below, we have available the schematic diagram of the 14V 4 Channel 200W MOSFET power amplifier circuit, this circuit is quite simple to assemble.

As we can see there are very few external components, making the circuit very simple to assemble, even for a technician or hobbyist with little experience in electronics can assemble it without much difficulty. 

Fig. 2 - Diagram 14V 4 Channel 200W MOSFET Quad Bridge Power Amplifier using TDA7850

It is important to remember to be careful when assembling the circuit, as simple as the circuit is. We must be careful not to invert any components, such as capacitors, or invert the input voltage of the circuit, because the integrated circuit or other components can be damaged easily.

Components List

  • Semiconductors
    • U1 ............ TDA7850 Integrated Circuit 

  • Resistors
    • R1 ............ 47KΩ Resistor (yellow, violet, orange, gold)
    • R2, R3 ..... 10K resistor (brown, black, orange, gold)

  • Capacitors
    • C1 to C4 ... 220nF Ceramic/Polyester Capacitor
    • C5, C6 ...... 1μF Ceramic/Polyester Capacitor
    • C7 ............. 470nF Ceramic/Polyester Capacitor
    • C8 ............. 47μF / 25V Electrolytic Capacitor
    • C9 ............. 2.200μF / 25V Electrolytic Capacitor
    • C10 ........... 100nF Ceramic/Polyester Capacitor

  • Miscellaneous
    • P1 to P9 .... Screw Terminal Type 5mm 2-Pin Connector
    • Other ........ PCB, Wires, Speaker, etc.

    Power Supply

    This amplifier is powered by unipolar source, with direct current, the maximum current required by the circuit is approximately 15 Amperes.

    And you can connect it directly to a car battery, or a motorcycle battery, or a no-break battery, or a bench power supply... 

    The power will be according to the power supply, and as already shown in the IC features above, to have 4 outputs of 50W we have to supply the circuit with 14.4V

    Printed Circuit Board

    In Figure 3, we provide the PCB - Printed Circuit Board, in GERBER, PDF and PNG files. These files are available for free download, on the MEGA server, in a direct link, without any bypass. 

    All to make it easier for you to do a more optimized assembly, either at home, or with a company that prints the board. You can download the files in the Download option below.

    Fig. 3 - PCB 14V 4 Channel 200W MOSFET Quad Bridge Power Amplifier using TDA7850

    Files to Download, Direct Link:

    Click on the link beside: GERBER, PDF and PNG files

    I hope you enjoyed it!!!

    If you have any questions, suggestions or corrections, please leave them in the comments and we will answer them soon.

    Subscribe to our blog!!! Click here - elcircuits.com!!!

    My Best Regards!!!

    Friday, April 1, 2022

    140W Class AB Amplifier using MJL4281A and MJL4302A transistors with PCB

    Fig. 1 - 140W Class AB Amplifier using MJL4281A and MJL4302A transistors with PCB

    Discover High-Fidelity Sound: Build a 140W Class AB Amplifier with MJL4281A and MJL4302A Transistors along with PCB

    This is a simple 140W Class AB amplifier using MJL4281A and MJL4302A transistors, which stands out for its simplicity, quality, and is a moderate amplifier to build.

    You can be making two of these boards, to be able to work with two outputs, in stereo, and make an amplifier with total power of 280W RMS.

    This amplifier works with a simple power supply, that is, a unipolar, non-symmetric power supply.
     
    This amplifier circuit can be used in almost any type of application that requires a simple amplifier, with great performance, low noise and low distortion, and good sound quality.

    It uses 2 output power transistors, NPN transistor MJL4281, and PNP transistor MJL4302, forming a pair of complementary transistors.

    You might also be interested in:

    The Power Transistors

    The MJL4281A and MJL4302A transistors are power transistors designed for high power audio, they have a collector-emitter sustaining voltage of 350 V.

    It's high gain – 80 to 240, with the hFE = 50 (min) 8A collector current, and a low harmonic distortion, which makes a transistor excellent for high power operation and audio quality.

    The Circuit

    This circuit has a moderate complexity, it is not recommended for those who have no experience in electronics and in the assembly of amplifier circuits.

    You should have minimum knowledge in an intermediate to advanced level to assemble this type of power amplifier.

    The schematic diagram of the complete circuit, shown in Figure 2 below, is a very robust amplifier, with great sound quality and very stable, responding very well at all audible frequencies, with little attenuation in the 20Hz to 20Khz hearing frequency range.

    Fig. 2 - Schematic Diagram 140W Class AB Amplifier using MJL4281A and MJL4302A transistors

    Power supply

    The power supply is symmetrical, with a voltage of +45V | 0V | -45V, and direct current, with at least 6 Amps of current. For continuous use, we recommend 4A, especially if used in a subwoofer.

    In Figure 3 below, we have a suggestion for a power supply that we use in our projects. In this article, besides having the schematic diagram with the Printed Circuit Board, you will understand how to easily calculate your own Power Supply, with the desired voltage.

    You can in the link below:

    Fig. 3 - Symmetrical Power Supply for Power Amplifiers

    Components List

    • Semiconductor
      • Q1, Q2, Q3 .... 2N5551 NPN Transistor
      • Q4, Q6 ........... BD139 NPN Transistor
      • Q5, Q7 ........... BD140 PNP Transistor
      • Q8 .................. MJL4302A NPN Transistor
      • Q9 .................. MJL4281A NPN Transistor
      • LED1 ............. Light Emitter Diode (general use

    • Resistor
      • R1, R3 ........... 2K2Ω resistor (red, red, red, gold
      • R2, R4, R8 ..... 22KΩ resistor (red, red, orange, gold)
      • R5, R6 ........... 560Ω resistor (green, blue, brown, gold)
      • R7 .................. 1K2Ω resistor (brown, red, red, gold)
      • R9 .................. 1KΩ resistor (brown, black, red, gold)
      • R10, R11 ....... 3K3Ω resistor (orange, orange, red, gold)
      • R12, R13 ....... 220Ω resistor (red, red, brown, gold)
      • R14, R15 ....... 0.22Ω / 5W resistor (red, red, silver, gold)
      • R16 ................ 10Ω / 1W resistor (brown, black, black, gold
      • RP1 ................ 2K Potentiometer
    • Capacitor
      • C1 .................. 2.2uF / 25V electrolytic capacitor 
      • C2 .................. 330pF ceramic, polyester capacitor
      • C3, C5 ........... 100uF / 65V electrolytic capacitor 
      • C4, C6, C7 .... 100nF ceramic, polyester capacitor

    • Miscellaneous 
      • P1, P2 ............ Screw Terminal Type 5mm 2-Pin Connector
      • P3 .................. Screw Terminal Type 5mm 3-Pin Connector
      • Others ............ PCB, tin, wires, heat sink, soldering Iron, etc.

    Printed Circuit Board - Download

    We are offering the PCB – Printed Circuit Board, in GERBER, PDF and PNG files, for you who want to do the most optimized assembly, either at home.

    If you prefer in a company that develops the board, you can is downloading and make the files in the Download option below.

    Fig. 3 - PCB - 140W Class AB Amplifier using MJL4281A and MJL4302A transistors

    Files to Download, Direct Link:

    Click on the link beside: GERBER, PDF and PNG files

    I hope you enjoyed it!!!

    If you have any questions, suggestions or corrections, please leave them in the comments and we will answer them soon.

    Subscribe to our blog!!! Click here - elcircuits.com!!!

    My Best Regards!!!

    Monday, March 28, 2022

    110/220VAC 4 Step Control Touch Dimmer Switch Lamp Circuit with PCB

    Fig. 1 110/220VAC 4 Step Control Touch Dimmer Switch Lamp Circuit with PCB

    Enhance Your Lighting: Build a 110/220VAC 4-Step Touch Dimmer Switch Circuit for Lamps with PCB Control

    This type of circuit is widely used in lampshades that are sold in residential lighting stores, it activates an incandescent bulb through the touch on the device's casing.

    It works as a dimmer with 4 pre-set levels, activated by touching a part of the sensor with your finger, which can be a metallic point, or a metallic housing, etc. The entire 4-level brightness control circuit is based on the LS7237 IC.

    LS7237 IC Description

    LS7237 is a 8-Pin monolithic, MOS integrated circuit designed to control the brightness of an incandescent lamp, as show in Figure 2 above. The output of the LS7237 triggers a Triac connected in series with a lamp. 

    Fig. 2 - Pinout LS7237

    The lamp brightness is determined by controlling the output conduction angle (Triac triggering angle) in relation to the AC line frequency.

    CAUTION!!!

    This circuit works directly connected to the 110/220V electrical network, and has a high power load, any carelessness, or wrong connections, error in the project, or any other occasion, can lead to irreversible damage. 

    We are not responsible for any type of event. If you do not have enough experience to assemble this circuit, do not do it, and if you do, when testing, be sure to have the proper protections and be accompanied by someone else.

    How the Circuit Work

    The circuit works as follows: when a touch is made to the board, it causes the brightness of the lamp to change in specified steps as follows:

    • LEVEL - - - BRIGHTNESS(% Rated Wattage)
    • Off .................... 0
    • Night Light ....... 9
    • Mood Light ...... 29
    • Medium ............ 66
    • Maximum ......... 99

    After AC power-up, the output comes up in the OFF state. Following that, every time the Touch Plate is touched, the output steps to the next level of brightness. The next step following the maximum brightness is the OFF state, initiating a new sequence.

    Features

    • PLL synchronization allows use as a Wall Switch
    • Provides brightness control of an incandescent lamp with a touch plate or mechanical switch
    • Can control speed of shaded pole and universal AC motors
    • Controls the "duty cycle" from 23% to 88% (conduction angles for AC half-cycles between 45˚ and 158˚, respectively)
    • Operates at 50Hz/60Hz line frequency
    • Extension input for remote activation
    • +12V to +18V DC Power Supply (VSS - VDD)
    • 8-Pin Plastic DIP , 8-Pin SOIC

    The Schematic Circuit

    The 110/220VAC 4 Step Control Touch Dimmer Switch Lamp Circuit diagram is shown in Figure 3 below.  

    Is a moderately simple circuit to assemble, with few external components, however one must have at least basic to advanced experience to assemble this circuit, if you are not experienced enough, ask someone more experienced to help you.

    Fig. 3 - 110/220VAC 4 Step Control Touch Dimmer Switch Lamp Circuit

    110Vac or 220Vac

    This circuit was designed to work with 220Vac voltage, for use in 110Vac power network, the following components must be replaced in the component list.

    • R1, R2 .... 2.7MΩ 1/4W (red, violet, red, gold) 
    • R6 ........... 270Ω 1W (red, violet, brown, gold)
    • C5 ........... 330nF / 400V polyester Capacitor 
    • L1 .......... 60µH (RFI Filter)

    Components List

    • Semiconductors
      • U1 ............ LS7237 Integrated Circuit
      • Q1 ............ BT136 Triac Transistor
      • D1 ............ 1N4007 Diode
      • DZ1 ......... 1N4744 15V/1W Zenner Diode 

    • Resistor
      • R1, R2 .... 4.7MΩ 1/4W (yellow, violet, green, gold) 
      • R3 ........... 1.8MΩ 1/4W (brown, gray, green, gold)
      • R4 ........... 1.5MΩ 1/4W (brown, yellow, green, gold)
      • R5 ........... 100Ω 1/4W (brown, black, brown, gold)
      • R6 ........... 1KΩ 2W (brown, black, red, gold)
    • Capacitor
      • C1 ........... 680pF / 400V Polyester Capacitor
      • C2 ............47nF / 400V Polyester Capacitor
      • C3 ........... 470pF/ 400V Ceramic Capacitor
      • C4 ........... 47µF / 25V Electrolytic Capacitor 
      • C5 ........... 220nF / 400V Polyester Capacitor
      • C6 ........... 150nF /400V polyester Capacitor

    • Miscellaneous 
      • L1 .......... 120µH (RFI Filter)
      • P1, P2 .... 2-pin PCB soldering terminal blocks
      • F1 .......... 3A/250V Soldering fuse
      • Others .... PCB, heat sink, power supply, wires, etc.

    Printed Circuit Board - Download

    We are offering the PCB - Printed Circuit Board, in GERBER, PDF and PNG files, for you who want to do the most optimized assembly, either at home.

    If you prefer in a company that develops the board, you can is downloading and make the files in the Download option below.

    Fig. 4 - PCB 110/220VAC 4 Step Control Touch Dimmer Switch Lamp Circuit

    Files to download, Direct Link:

    I hope you enjoyed it!!!

    If you have any questions, suggestions or corrections, please leave them in the comments and we will answer them soon.

    Subscribe to our blog!!! Click here - elcircuits.com!!!

    My Best Regards!!!

    Saturday, March 26, 2022

    How to Wire LEDs in 110V or 220 Volts - 6 Different Circuits! Formulas & Calculations!

    Fig. 1 - How to Wire LEDs in 110V or 220 Volts - 6 Different Circuits! Formulas & Calculations!

    Illuminating Insights: Wiring LEDs for 110V or 220V - Explore 6 Distinct Circuits with Formulas and Calculations!

    Today we will show you 6 different ways to wire 3mm or 5mm LEDs, which are low voltage DC components, into a 110V or 220V AC voltage grid!

    We can use LEDs in several ways connected to 110V or 220V power grid, knowing that some types of connections bring advantages over others, and that each type has its characteristics that best fit each specification. 

    We will use some basic formulas to calculate the components in our circuit, for this we will use the capacitive reactance formula, and the Ohms Law formula.

    So let's start by showing the basic formulas that we will use with the models we made in this post. 
    We'll apply the basic formulas as needed, so we'll start first by determining the supply voltage. 

    CAUTION! 

    As simple as the circuits presented are, it is important to know that the circuit is connected to direct mains voltage, this is extremely dangerous, an oversight or design error, can cause irreversible damage.
    Be cautious when handling electrical voltage, if you have no electronics/electrical experience, do not do this circuit.
    If you are experienced, do it with caution, and always have someone nearby, do not handle mains-connected equipment when you are alone.
    We are not responsible for any damage that happens to you or others.

    The working voltage

    In our country the working voltage is 110VAC, if your electrical network is 220VAC, just substitute the working voltage of your region in the formula.

    It is necessary to know that our grid voltage has peak voltages, as showing in Figure 2 below, and for our safety we will use the peak to peak voltage (VPP) in our calculations.

    Fig. 2 - Peak to Peak 110Vac Calculation - VPP

    The calculation is determined by the mathematical equation:

    • VP = VAC * (2)

    As our power grid is 110VAC:

    • VP = 110 *1.414
    • VP = 155.54VAC

    If you use the 220VAC power grid:

    • VP = 220V * 1.414
    • VP = 311,08VAC

    The LED

    • We will use a white LED, which in its specifications is 3.2V for 20mA, or 0.02A.

    Determine the resistor resistance:

    To determine the resistor resistance for the circuit, using the Ohms Law formula:
    • V = R * I
    V = Voltage
    R = Resistance 
    I = Current

    Determine the Resistor's Power:

    And to determine the resistor's power we will also use Ohms' Law:
    • P = R * I²
    P = Resistor Power
    R= Resistor Value 
    I = Current passing through the resistor.

    Determine Capacitive Reactance:

    Capacitive reactance is the opposition that a capacitor presents to the flow of current in AC circuits.

    Capacitive reactance is represented by the notation Xc, and is expressed in ohms. To determine the capacitive reactance Xc, we will use the equation:

    • XC = 1 / (2 π  * F * C)
    XC = Capacitive Reactance in Ω
    π = 3,14 - Constant
    F = AC Frequency in Hz
    C = Capacitance in F

    Knowing all the formulas that we will use in our circuits, let's start with the simplest to the most complex.

    1° Circuit:

    This model is the simplest we have, and it is very often used in cheap electrical extensions of those Chinese products, and also as a Pilot lamp in equipment,... 

    The circuit presented has only one resistor R1, which limits the current that passes through the LED, and is connected in series with the LED, as we can see in Figure 3 below.

    Fig. 3 - Wire LED in 110v or 220V Circuit 1 - ELC

    Designing the Circuit

    We need to determine the resistance to be used, for this we will use the ohms law formula:

    General Formula:

    • V = R * I

    Applying the formula to our circuit:

    • R = (VS - VL) / I 
    VS = Peak mains voltage, which is 155.54Vac
    VL = Voltage of the LED, which is 3.2V
    IL = The LED current, which is 0.02A

    Then:

    • R = (155,54 - 3.2) / 0.02
    • R = 152,34 / 0.02
    • R = 7.617R

    As we know, when it comes to electronic components, there is the tolerance of the components that make up the circuit, such as the tolerance; of the resistor, the LED, and the variations "tolerance" coming from the Power grid.

    For this reason, we give a tolerance margin of more or less 40% more in the load resistor, that is:

    • 7.617Ω + 40% = 3.047Ω
    • 7.617Ω + 3.047Ω = 10.6638Ω or 10.66KΩ
    • That is, the value of the closest commercial resistor, knowing that we always take the closest one with the highest value is 12KΩ.

    We now need to determine the power of the resistor, for this we will use the ohms law formula:

    General Formula:

    • P = R * I²

    Then:

    • P = 12.000 * 0.02²
    • P = 4.8W

    Project Finished - Circuit 1

    We finish here the development of our circuit 1, the calculated values we will have:
    • LED1 ....... 3.2V / 20mA Light Emitting Diode
    • R1 ............ 12K / 5W Resistor for 110V. (27K to 220V).

    Advantages:

    • It is a Simple and easy circuit to assemble
    • Only 2 components

    Disadvantages:

    • Voltage dissipation will be on the resistor (Joule effect)
    • Consumption higher than necessary
    • Circuit operating in half wave, LED half off 
    • Short LED lifetime, reverse voltage on LED
    • Low Efficiency

    2° Circuit:

    This model is still quite simple, it is a circuit widely used also in cheaper electrical extensions of those Chinese products... 

    The circuit presented has a resistor R1, which limits the current that passes through the LED, and a Diode, which polarizes the AC voltage coming from the power grid, which is connected in series with the LED, as we can see in Circuit 2.1 in Figure 4 below. .

    We also have Circuit 2.2, which is the same circuit, but we have added a 2.2uF capacitor that serves to minimize the ripple voltage in the circuit. 

    Fig. 4 - Wire LED in 110v or 220V Circuit 2 - ELC

    Designing the Circuit

    Just like the previous circuit, the calculations are the same, we already calculated the resistance, after all the process, it was 12K with 5W of power.

    Project Finished - Circuit 2

    Here we finish the development of our circuit 2, the calculated values are

    • LED1 ....... Light Emitting Diode 3.2V / 20mA
    • D1 ............ 1N4007 Diode
    • C1 ............ 2.2uF / 25V Electrolytic Capacitor (Optional)
    • R1 ............ 12K / 5W resistor for 110V. (27K at 220V).

    Advantages:

    • It is a simple and easy circuit to assemble
    • Only 3 or 4 components
    • Safer circuit for LED lifetime

    Disadvantages:

    • Voltage dissipation will be on the resistor (Joule effect)
    • Consumption higher than necessary
    • Circuit operating in half wave, LED half off
    • Low Efficiency

    3° Circuit

    This model, different from the previous one, adopts a rectifier bridge, this implies that the energy that comes to the LED, is no longer a half wave, but a full wave, which gives more brightness to the LED.

    The circuit presented has a resistor R1, current limiter, and a bridge of diodes, which polarize the AC voltage that comes from the grid, and feeds the LED, as we can see in Circuit 2.1 in Figure 5 below.

    We also have Circuit 2.2, which is the same circuit, but we add a 2.2uF capacitor that serves to minimize the ripple voltage in the circuit. 

    Fig. 5 - Wire LED in 110v or 220V Circuit 3 - ELC

    Designing the Circuit

    Just like the previous circuit, the calculations are the same, we already calculated the resistance, after all the process, it was 12K with 5W of power.

    Project Finished - Circuit 3

    Here we finish the development of our circuit 2, the calculated values are

    • LED1 ....... Light Emitting Diode 3.2V / 20mA
    • D1 ............ 4 x 1N4007 Diode, or a diode bridge any model
    • C1 ............ 2.2uF / 25V Electrolytic Capacitor (Optional)
    • R1 ............ 12K / 5W resistor for 110V. (27K at 220V).

    Advantages:

    • It is a simple circuit to assemble
    • Only 3 or 4 components
    • Full wave, which gives more brightness to the LED.
    • Safer circuit for LED lifetime

    Disadvantages:

    • Voltage dissipation will be on the resistor (Joule effect)
    • Consumption higher than necessary
    • Low Efficiency

    4° Circuit:

    This model is simple, but works in a more efficient way, since the heat dissipation is no longer tied to the Current Limiting Resistor, which dissipated all the voltage in the previous circuits.

    This circuit is widely used in Mosquito Bats, rechargeable flashlights, i.e. cheaper Chinese products. 

    In this circuit we replaced the current limiting resistor with a capacitor. When a capacitor is connected to an AC source, it allows current to flow in a circuit.

    With the process of successive charge and discharge of a capacitor, it gives rise to a resistance, in the passage of current in the circuit, and this resistance is called capacitive reactance. With these properties, we can use the capacitor in our circuit as a resistor.

    In the case of the capacitor, all of this energy is used, because the capacitor needs to charge and discharge, it "holds" the energy and therefore does not consume it, making the circuit much more efficient. 

    We also have Circuit 4.2, which is the same circuit, but we have added a 2.2uF capacitor that serves to minimize the ripple voltage in the circuit. The complete circuits are in Figure 6 below.

    Fig. 6 - Wire LED in 110v or 220V Circuit 4 - ELC

    Designing the Circuit

    We need to determine the capacitive reactance to be used, for this we will use the Ohms' Law formula, it is exactly the formula used to figure out the resistance of R1 in the previous circuits.

    Remember: The and I values are effective, so we will use the RMS voltage, not the VPP voltage. 

    General Formula:

    • XC = (VS - VL) / IL 

    Applying the formula to our circuit:

    • XC = (VS - VL) / I 
    • VS = Mains voltage, which is 110Vac
    • VL = Voltage of the LED, which is 3.2V
    • IL = The LED current, which is 0.02A

    Then:

    • XC = (110 - 3.2) / 0.02
    • XC = 106.8 / 0.02
    • XC = 5.340Ω or 5.3K

    Since we have already found out the Xreactance which is 5.340Ω or 5.3KΩ, we can now calculate the current that this capacitor will supply to our circuit. We will use the same formula as in Ohms' Law

    General Formula:

    • I = VS  / XC
    • VS = Main voltagem in RMS
    • XC = Capacitive Reactance in Ω

    Applying the formula to our circuit:

    • I = (VS - VL) / XC
    VS = Mains voltage RMS, which is 110Vac
    VL = Voltage of the LED, which is 3.2V
    XC = Capacitive Reactance, which is 5.340Ω

    Then:
    • I = (110 - 3.2) / 5.340
    • I = (106.8) / 5.340
    • I = 0.02A
    • I = 20mA
    Knowing the resistance XC and current values in the circuit, we need to determine the capacitance of the capacitor. We will do this as follows below:

    General Formula:
    • C = 1 / (2 π  * FXC

    Since capacitance is usually not expressed in Farad but in a submultiple, we will use the rewritten formula, so that we can use the capacitor value in µF and make our calculations easier.

    Applying the formula to our circuit:

    • C = 106 / (2 π * F * XC) 
    C = Capacitance that we need to know
    π = Is a constant 3.14
    XC = Capacitive Reactance, which is 5.340Ω
    F = Main frequency, which is 60Hz


    Then:
    • C 106 / (2 * 3.14 * 60 * 5.340) 
    • C = 106 / (6.28 * 60 * 5.340) 
    • C = 106 / (376.8* 5.340) 
    • C = 106 / (2,012.112) 
    • C = 0.4969uF or 497nF
    That is, the value of the closest commercial capacitor, knowing that we always take the closest one with the highest value is 560nF.

    Project Finished - Circuit 4

    We finish here the development of our circuit 4, the calculated values we will have:
    • LED1 ....... Light Emitting Diode 3.2V / 20mA
    • D1 ........... 1N4007 Diode
    • C1 ............ 560nF / 250V Polyester Capacitor
    • C2 ............ 2.2uF / 25V Electrolytic Capacitor (Optional)

    Advantages:

    • No consumption of excess heat energy (Joule effect)
    • It is simple circuit to assemble
    • Only 3 or 4 components
    • High Efficiency
    • Safer circuit for LED lifetime

    Disadvantages:

    • Circuit operating in half wave, LED half off 
    • High current in the initial steady state of the capacitor, causing those "pops" and sparks in the socket.

    5° Circuit:

    This model is a more complete and improved circuit, because it brings with it a diode bridge, improving efficiency even more, since the LED will no longer work for half a wave period, but for a full wave period.

    This circuit is widely used in small luminaires, even in LED lamps, rechargeable flashlights, or in commercial products. 

    This circuit is the junction of circuits 3 and 4, thus forming an efficient circuit, with good LED brightness, with full wave, it is almost the perfect circuit. 

    The circuit presented has a diode bridge, which polarizes the AC voltage coming from the mains, which is connected in series with the LED, as we can see in Circuit 5.1 in Figure 7 below.

    We also have Circuit 5.2, which is the same circuit, but we add a 2.2uF capacitor that serves to minimize the ripple voltage in the circuit.

    Fig. 7 - Wire LED in 110v or 220V Circuit 5 - ELC

    Designing the Circuit

    First you need to determine the capacitive reactance, which was already done in the previous circuit, the capacitance is 5.340Ω or 5.3K.

    Project Finished - Circuit 5

    We finish here the development of our circuit 5, the calculated values we will have:
    • LED1 ....... Light Emitting Diode 3.2V / 20mA
    • D1 ........... 4 x 1N4007 Diode, or a diode bridge, any model
    • C1 ........... 560nF / 250V Polyester Capacitor
    • C2 ........... 2.2uF / 25V Electrolytic Capacitor (Optional)

    Advantages:

    • It is a simple circuit to assemble
    • Only 3 or 4 components
    • Safer circuit for LED lifetime
    • No consumption of excess heat energy (Joule effect)
    • High Efficiency
    • Circuit operating in full wave, LED always on

    Disadvantages:

    • High current in the initial steady state of the capacitor, causing those "pops" and sparks in the socket.

    6° Circuit:

    This model is more complete and, like the previous circuit, is more efficient. This circuit is widely used in small light fixtures, some LED lamps, rechargeable flashlights, and in some commercial products. 

    The circuit presented is identical to circuit 5, with the only difference that we put a resistor R1, that serve to limit the capacitor inrush current. A diode bridge, which polarizes the AC voltage coming from the mains, which is connected in series with the LED, as we can see in Circuit 6.1 in Figure 8 below.

    We also have Circuit 6.2, which is the same circuit, but we have added a 2.2uF capacitor that serves to minimize the ripple voltage in the circuit.

    Fig. 8 - Wire LED in 110v or 220V Circuit 6 - ELC

    Designing the Circuit

    First you need to determine the resistance R1, the resistor value was chosen to limit the worst case inrush current to about 100mA which for safety, will be 5 times the current draw of the circuit, which will drop to less than 20mA in a millisecond as the capacitor charges.

    In this case, we use ohms' law to figure out what resistor we will use.

    General Formula:

    • V = R * I

    Applying the formula to our circuit:

    • R = (VS - VL) / I 
    • VS = Mains voltage, which is 110Vac
    • VL = Voltage of the LED, which is 3.2V
    • IL = Inrush current, which is 0.1A or 100mA

    Then:

    • R = (110 - 3.2) / 0.100
    • R = 106 / 0.100
    • R = 1,068Ω or ~1KΩ

    Now, we need to determine the power of the resistor, for this we will use the ohms law formula:

    General Formula:

    • P = R * I²

    Then:

    • P = 1,068 * 0.02²
    • P = 0.427W

    That is, the value of the closest commercial power resistor, knowing that we always take the closest one with the highest value is 1/2W.

    Project Finished - Circuit 6

    We finish here the development of our circuit 5, the calculated values we will have:
    • LED1 ....... Light Emitting Diode 3.2V / 20mA
    • D1 ........... 4 x 1N4007 Diode, or a diode bridge, any model
    • R1 ........... 1KΩ / 1/2W Resistor
    • C1 ........... 560nF / 250V Polyester Capacitor
    • C2 ............ 2.2uF / 25V Electrolytic Capacitor (Optional)

    Advantages:

    • It is a simple circuit to assemble
    • Only 3 or 4 components
    • Safer circuit for LED lifetime
    • No consumption of excess heat energy (Joule effect)
    • High Efficiency
    • Circuit operating in full wave, LED always on

    Disadvantages:

    • Can be better, by putting a resistor in parallel as a capacitor, to discharge it...

    I hope you enjoyed it!!!

    If you have any questions, suggestions or corrections, please leave them in the comments and we will answer them soon.

    Subscribe to our blog!!! Click here - elcircuits.com!!!

    My Best Regards!!!