Português
 Español
ESP8266 Guide: Features, Specs and Practical Uses You Should Know

ESP8266: Complete Guide with Features, Specifications, and Practical Applications
🔥 Quick News: The ESP8266 continues to be one of the most popular microcontrollers for IoT projects in 2025! Discover why this affordable chip still dominates the maker and professional scene.
🧠 Introduction to ESP8266: The Revolutionary Wi-Fi Microcontroller
The ESP8266 is one of the most popular Wi-Fi microcontrollers in the maker and IoT world. Launched by Espressif Systems, it revolutionized the market by offering integrated Wi-Fi connectivity at a low cost, making it possible to create affordable and efficient smart devices.
Imagine transforming any common object into a smart device for less than $6. That’s exactly what the ESP8266 made possible! Since its creation, this small giant has democratized access to the Internet of Things (IoT), allowing students, hobbyists, and professionals to create innovative projects without needing to invest fortunes.

Fig. 2 – ESP8266 NodeMCU development board, one of the most popular
Thanks to its versatility, the ESP8266 is used in home automation, remote monitoring, smart sensors, and educational projects. It’s the ideal starting point for anyone wanting to master the universe of the Internet of Things (IoT).
💡 Expert Tip: If you’re starting with IoT, the ESP8266 is the perfect choice. It offers an ideal balance between cost, functionality, and support community.
⚙️ What is the ESP8266? Unveiling the SoC that Connected the Maker World
The ESP8266 is a SoC (System-on-Chip) that combines a 32-bit Tensilica L106 processor, Wi-Fi 802.11 b/g/n support, and flash memory in a single module.
It was initially designed to add Wi-Fi connectivity to other microcontrollers (like Arduino), but quickly evolved to operate autonomously, executing complete codes without depending on external boards.
Key features:
-
32-bit CPU (80 MHz or 160 MHz) – Fast processing for your IoT applications
-
Integrated Wi-Fi – Connectivity without the need for additional modules
-
Flash memory up to 16 MB – Generous space for your codes and data
-
Configurable GPIOs – Flexibility to connect sensors and actuators
-
Support for SPI, I2C, UART, PWM, and ADC – Communication with various electronic components
This combination made the ESP8266 the favorite of low-cost developers and hobbyists. Think of it as the “Swiss Army knife” of electronics: small, versatile, and surprisingly powerful!
🤔 Fun Fact: The ESP8266 was initially developed as a complementary module for other microcontrollers. However, the maker community quickly discovered its potential as an independent processor, revolutionizing its use in IoT projects.
📊 Technical Specifications of the ESP8266: The Power Behind the Small Giant
To truly understand the potential of the ESP8266, we need to dive into its technical specifications. Prepare to be surprised by what this small chip can do!
| Specification | Description |
|---|---|
| Processor | Tensilica L106 32-bit RISC, 80/160 MHz |
| RAM Memory | 64 KB instruction + 96 KB data |
| External Flash | Up to 16 MB |
| Wi-Fi | IEEE 802.11 b/g/n |
| Operating Voltages | 3.0V – 3.6V |
| Available GPIOs | 17 (depending on model) |
| ADC | 10 bits |
| Protocols | SPI, I2C, UART, PWM |
| Active Mode Consumption | 70 mA – 200 mA |
| Deep Sleep Consumption | <10 µA |
| Operating Temperature | -40°C to 125°C |
These specifications make it a module with excellent cost-benefit ratio, ideal both for prototyping and for final products.
🔌 Most Popular ESP8266 Models: Choosing the Ideal for Your Project
There are several modules derived from the main ESP8266 chip, each with specific characteristics for different types of projects. Let’s explore the most common ones:
| Model | Description | Application |
|---|---|---|
| ESP-01 | Compact model, with 2 GPIOs | Simple projects and serial communication |
| ESP-07 | External antenna and extra pins | Greater Wi-Fi range |
| ESP-12E / 12F | High integration and 11 GPIOs | Automation and prototypes |
| NodeMCU | Board with integrated USB | Easy programming via Arduino IDE |
| Wemos D1 Mini | Compact and powerful | Ideal for portable IoT |
Each model has unique advantages, and the choice depends on the type of project. For beginners, we recommend the NodeMCU or Wemos D1 Mini for ease of programming and USB connection.
🎯 Expert Recommendation: If you’re starting, start with NodeMCU. It already comes with voltage regulator, USB connection, and all pins accessible, saving a lot of time in initial setup.
🔩 ESP8266 Pinout: Connecting Your Digital World
The pinout varies according to the module. On the NodeMCU, for example:
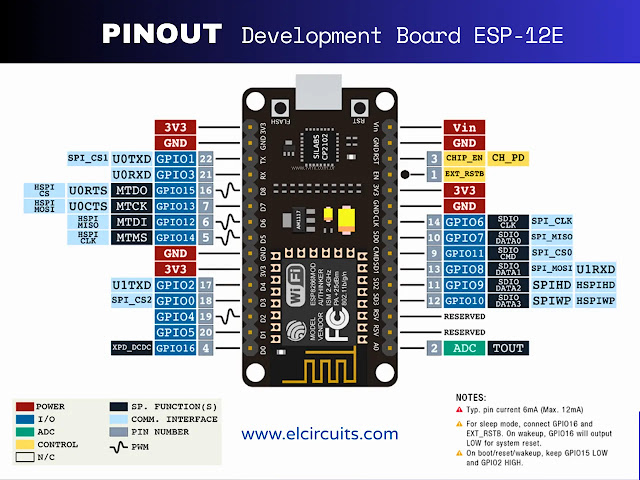
Pinout NodeMCU ESP8266 Development Board
-
D0–D8: GPIOs for sensors, relays, LEDs, etc.
-
A0: Analog input (0–1V).
-
TX/RX: Serial communication.
-
3V3 and GND: Power supply.
-
EN and RST: Chip enable and reset.
A good practice is to avoid using GPIOs 0, 2, and 15 incorrectly, as they affect the boot mode. GPIO 0, for example, should be high during normal boot, but low to enter flash mode.
⚠️ Technical Alert: Be especially careful with power pins! The ESP8266 operates at 3.3V and is not 5V tolerant. Connecting input pins directly to 5V can permanently damage the chip.
🌐 Communication and Protocols: The Language of the ESP8266
The ESP8266 supports various communication protocols, making it extremely versatile:
-
UART: serial communication with other microcontrollers. Perfect for connecting with Arduino, Raspberry Pi, or computers.
-
SPI: fast transfer with sensors and displays. Ideal for high-speed displays and SD cards.
-
I2C: communication with multiple devices using only two wires. Excellent for connecting sensors like BMP180, MPU6050, and OLEDs.
-
PWM and ADC: light intensity control and analog reading. Use PWM to control LED brightness or motor speed, and ADC to read analog sensors.
This compatibility makes the module highly flexible and ideal for integration into complex systems. Whether for a simple temperature sensor or a complete home automation system, the ESP8266 has the necessary protocols.
💡 Analogy to Understand: Think of protocols as different languages that the ESP8266 speaks. UART is like a direct conversation, SPI is like a fast phone call, and I2C is like a chat room where multiple people talk at the same time.
📶 Wi-Fi and Network Connectivity: Connecting Your Project to the World
-
Connect to home routers;
-
Create its own Wi-Fi network;
-
Communicate with other devices via TCP/IP or HTTP.
There are also ready libraries for MQTT, Blynk, Firebase, and ThingSpeak, facilitating integration with cloud services. With MQTT, for example, you can create automation systems that respond in real-time to events, such as turning on a light when a sensor detects movement.
🚀 Quick Project: With just 20 lines of code, you can create a web server on the ESP8266 that displays sensor data and allows remote control of devices. It’s the fastest way to prototype IoT solutions!
⚡ Power Supply and Energy Consumption: Keeping Your Project Alive
The ESP8266 works with 3.3V, and you should avoid connecting it directly to 5V, as it can burn the chip.
Essential power tips:
-
Use AMS1117 or LD1117 regulators to convert from 5V to 3.3V.
-
Capacitors of 100 µF + 0.1 µF help with stability, especially during Wi-Fi transmissions.
-
In deep sleep mode, consumption drops to less than 10 µA, ideal for battery-powered sensors.
With proper use, the module can operate for months in portable projects. For battery-powered projects, consider using deep sleep mode and waking up only to make periodic readings or transmit data.
⚠️ Important Care: The ESP8266 can consume up to 200mA during Wi-Fi transmissions! Make sure your power supply can provide enough current to avoid unexpected restarts.
💻 Programming and Compatible IDEs: Bringing Your ESP8266 to Life
The ESP8266 can be programmed in various ways, depending on your level of experience and preference:
-
Arduino IDE – simple and popular. Perfect for those who already have experience with Arduino.
-
MicroPython – ideal for quick scripts and agile prototyping.
-
Lua (NodeMCU firmware) – lightweight and efficient language, great for simple projects.
-
PlatformIO – professional and multi-platform environment, with support for various libraries and advanced tools.
Simple example in Arduino IDE:
Exemplo simples em Arduino IDE:
#include <ESP8266WiFi.h>void setup() { Serial.begin(115200); WiFi.begin("SSID", "password"); while (WiFi.status() != WL_CONNECTED)
{ delay(500);
Serial.print(".");
}
Serial.println("Conected!");
    Serial.println("IP Address: " +
WiFi.localIP().toString());
}
void loop() {
// Your code here}🧰 Practical Applications with ESP8266: Transforming Ideas into Reality
The ESP8266 is present in various IoT projects, from simple to complex:
-
Control of lamps and relays via Wi-Fi;
- Security Alarm with PIR Sensor
-
Temperature and humidity monitoring with DHT11/DHT22;
-
Home automation with Alexa or Google Home;
-
Development boards for technical education;
-
Web servers and local dashboards.
🌟 Featured Project: With an ESP8266 and a DHT11 sensor, you can create a climate monitoring system that sends data to the cloud every 10 minutes and displays real-time graphs. All of this for less than $10!
⚖️ Advantages and Limitations: Knowing the Strengths and Weaknesses
Advantages:
-
Affordable price – One of the cheapest Wi-Fi microcontrollers on the market.
-
Integrated Wi-Fi – No need for additional modules.
-
Large community – Thousands of tutorials and examples available.
-
Easy programming – Support for Arduino IDE and other popular platforms.
Limitations:
-
Only one ADC (10 bits) – Limits simultaneous analog readings.
-
Few available GPIOs – Can be restrictive for complex projects.
-
No Bluetooth – Requires alternative solutions for short-range communication.
Even so, it continues to be one of the most used chips in the maker world, especially for projects where cost is a determining factor.
⚔️ 12. ESP8266 vs ESP32: Which to Choose?
A common question is choosing between the ESP8266 and its successor, the ESP32. Let’s compare:
| Feature | ESP8266 | ESP32 |
|---|---|---|
| Cores | 1 | 2 |
| Clock | 80/160 MHz | Up to 240 MHz |
| Bluetooth | No | Yes |
| GPIOs | Up to 17 | Up to 30 |
| ADC | 1 channel | 18 channels |
| Consumption | Lower | Moderate |
| Price | Cheaper | Slightly more expensive |
The ESP32 is more powerful, but the ESP8266 is still unbeatable in simplicity and cost. For simple IoT projects, where only Wi-Fi is needed, the ESP8266 continues to be an excellent choice.
🎯 Golden Rule: If your project only needs Wi-Fi and has a limited budget, go with ESP8266. If you need Bluetooth, more GPIOs, or parallel processing, the ESP32 is worth the extra investment.
🧱 Best Practices: Maximizing Performance and Durability
To ensure the best performance and lifespan of your ESP8266, follow these best practices:
-
Use regulated 3.3V power sources with capacity of at least 500mA.
-
Avoid long cables between modules to reduce noise and interference.
-
Update firmware periodically to get stability and security improvements.
-
Disable Wi-Fi when not needed (to save energy) using
WiFi.mode(WIFI_OFF)in your codes. -
Always test the network stability in environments with multiple Wi-Fi devices.
-
Use pull-up resistors on input pins to avoid fluctuations.
-
Implement watchdogs in your codes for automatic restart in case of crashes.
💡 Advanced Tip: For critical projects, implement an OTA (Over-The-Air) update system. This allows you to update the ESP8266 firmware remotely, without needing physical access to the device.
🧩 Troubleshooting Common Problems: Overcoming Technical Challenges
Even the most experienced developers face problems. Here are the most common ones and their solutions:
| Problem | Cause | Solution |
|---|---|---|
| Upload fails | Incorrect GPIO | Adjust boot mode (GPIO 0 in LOW during upload) |
| Constant restart | Insufficient current | Use 1A+ power source and check voltage regulator |
| Doesn’t connect to Wi-Fi | Wrong SSID | Check password and signal, try different channel |
| Overheating | Incorrect power supply | Use stable 3.3V and check for short circuits |
| Insufficient memory | Excessive global variables | Optimize code and use PROGMEM for constants |
These precautions avoid headaches and ensure reliable operation. Remember: most problems with the ESP8266 are related to power supply or incorrect pin configuration during boot.
🔧 Expert Tip: Keep a basic “diagnostic kit”: a multimeter, an oscilloscope (if possible), and a USB-Serial converter. These tools will help you quickly identify most problems.
🤔 Frequently Asked Questions (FAQs): Clearing Your Doubts
To ensure your project is a success, we’ve compiled some of the most common questions about this module. Check it out!
❓ Does the ESP8266 need Arduino to work?🔽
No. It can be programmed and run independently using various languages and IDEs, such as MicroPython, Lua, or Espressif’s own SDK.
❓ Can I use the ESP8266 for home automation?🔽
Yes, it’s ideal for that! It easily communicates via Wi-Fi and protocols like MQTT, allowing you to create complete automation systems at low cost.
❓ Is it possible to use the ESP8266 with batteries?🔽
Yes, with deep sleep mode, it consumes very little (less than 10µA), allowing devices to operate for months or even years with simple batteries.
❓ Is the ESP8266 compatible with Alexa or Google Home?🔽
Yes, through platforms like Sinric Pro, IFTTT or by directly implementing the necessary protocols. There are numerous tutorials available.
❓ What is the maximum Wi-Fi distance?🔽
Approximately 100 meters in open field, but this distance can be significantly reduced in indoor environments with obstacles.
❓ Is the ESP8266 still worth it in 2025?🔽
Definitely! It continues to be efficient, affordable, and widely used in educational and professional projects. For many applications, especially those that only require Wi-Fi, it’s still the most economical choice.
🧾 Conclusion: Why the ESP8266 Continues to Reign in the IoT World
If you’re looking for flexibility, active community, and abundant documentation, the ESP8266 continues to be an excellent choice in 2025. Its simplicity, combined with sufficient power for most IoT applications, makes it the perfect entry point to the fascinating world of the Internet of Things.
🚀 Next Steps: Now that you know the ESP8266, how about starting your first project? We recommend starting with a simple web server that controls an LED and then evolving to an environmental monitoring system. The possibilities are endless!
🔗 Explore More Amazing Projects
Did you like this project? Then you’ll love exploring other charger circuits we’ve prepared. Each with its own peculiarities and ideal applications!
Artículo original publicado en FVML (Portugués) – 18 de diciembre de 2019
✨ Our Gratitude and Next Steps
We sincerely hope this guide has been useful and enriching for your projects! Thank you for dedicating your time to this content.
Your Feedback is Invaluable:
Have any questions, suggestions, or corrections? Feel free to share them in the comments below! Your contribution helps us refine this content for the entire ElCircuits community.
If you found this guide helpful, spread the knowledge!
🔗 Share This Guide
Best regards,
The ElCircuits Team ⚡