Showing posts with label Learning. Show all posts

Saturday, November 6, 2021

Arduino: Lesson 9 - LED Sequencing using Array Data Structure

  
Fig. 1 - Arduino: Lesson 9 - LED Sequencing using Array Data Structure

Welcome to Lesson 9 - Basic Arduino Course

In today's lesson, we will learn how to use 5 LEDs connected to 5 Arduino ports, which will light up in sequence and right after the cycle ends, will go out in sequence. With that, we will learn a new instruction, the Array data structure.

What is Array?

An array is a collection of variables that are accessed with an index number. However, the "array" data structure is not exactly an existing data type

There are arrays of variables like "char", "int", "boolean", "float" and so on. This means that an array can be variables of any type mentioned above.

An array, or vector, for example, is a collection of variables of a specific type, which may even use the same nomenclature, but which will be distinguished by an indexed number.

For example: We can use a variable type "float" with a single name indexed by number, instead of different variables (VarFloat_1, VarFloat_2, VarFloat_3...) we can use a single grouped array with the same nomenclature that will allow each variable be manipulated separately by a numerical index, (VarFloat [0], VarFloat [1], VarFloat [2] ...).

Hardware Required

  • Arduino Board
  • 5 - LEDs
  • 5 - 250 ohms resistor - (brown, green, brown, gold)
  • Jumper Wires
  • Protoboard (optional)

The Circuit Connections

The circuit is a bit simple, we connect the longer "Anode" legs of the 5 LEDs to the positive 5V of the Arduino, and the other shorter leg "Cathode", we connect to the 150 ohm resistor and in series with GND, negative of the Arduino, as shown in Figure 2 below.

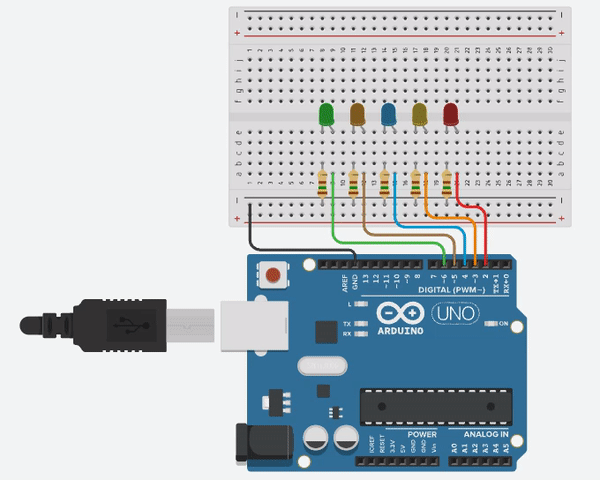
Fig. 2 -  LED Sequencing using Array Data Structure - tinkercad.com


We use a protoboard to facilitate the connections, but you can also connect the wires directly to the Arduino.

The Code

The code can be implemented in the normal way in programming, as shown in the code below. But the code is quite large, we use 42 lines of code to create this kind of sequential LED circuit. To write less lines of code, an "optimizer" is required. 

1
2
3
4
5
6
7
8
9
10
11
12
13
14
15
16
17
18
19
20
21
22
23
24
25
26
27
28
29
30
31
32
33
34
35
36
37
38
39
40
41
42
// Arduino: Lesson 9 - LED Sequencing using Array Data Structure

const int Led1 =  2;        // Select the output LED1 PIN
const int Led2 =  3;        // Select the output LED2 PIN
const int Led3 =  4;        // Select the output LED3 PIN
const int Led4 =  5;        // Select the output LED4 PIN
const int Led5 =  6;        // Select the output LED5 PIN

void setup() {                // This function is called once when the program starts  
 pinMode(Led1, OUTPUT);    // Initialize digital pin LED1 as an output.
 pinMode(Led2, OUTPUT);    // Initialize digital pin LED2 as an output.
 pinMode(Led3, OUTPUT);    // Initialize digital pin LED3 as an output.
 pinMode(Led4, OUTPUT);    // Initialize digital pin LED4 as an output.
 pinMode(Led5, OUTPUT);    // Initialize digital pin LED5 as an output.
}

void loop() { // The loop function runs over and over again as long as the Arduino has power.
// Turn ON each  LED sequence in order
  digitalWrite(Led1, HIGH);
  delay(150);                             // Wait for 150 millisecond(s)
  digitalWrite(Led2, HIGH);
  delay(150);                             // Wait for 150 millisecond(s)
  digitalWrite(Led3, HIGH);
  delay(150);                             // Wait for 150 millisecond(s)
  digitalWrite(Led4, HIGH);
  delay(150);                             // Wait for 150 millisecond(s)
  digitalWrite(Led5, HIGH);
  delay(150);                             // Wait for 150 millisecond(s)

// Turn OFF each  LED sequence in order
  digitalWrite(Led1, LOW);
  delay(150);                             // Wait for 150 millisecond(s)
  digitalWrite(Led2, LOW);
  delay(150);                             // Wait for 150 millisecond(s)
  digitalWrite(Led3, LOW);
  delay(150);                             // Wait for 150 millisecond(s)
  digitalWrite(Led4, LOW);
  delay(150);                             // Wait for 150 millisecond(s)
  digitalWrite(Led5, LOW);
  delay(150);                             // Wait for 150 millisecond(s)
}
//------------------------------------- www.elcircuits.com --------------------------------------------

This is where the Array data structure comes into play, we can use it to drastically reduce the number of lines of code, as shown in the code example below.


1
2
3
4
5
6
7
8
9
10
11
12
13
14
15
16
17
18
19
20
21
// Arduino: Lesson 9 - LED Sequencing using Array Data Structure

const int Leds =  5;                                      //Number of LEDs in the circuit
const int PinLeds[Leds] = {2, 3, 4, 5, 6};   //LEDs connected to pins 2 to 6

void setup() {                 // This function is called once when the program starts
  for (int i = 0; i < Leds; i++) {            // Go through each of the elements in our array
    pinMode(PinLeds[i], OUTPUT);    // And set them as OUTPUT
  }
}
void loop() { // The loop function runs over and over again as long as the Arduino has power.
  for (int i = 0; i < Leds; i++) {            // Go through each of the Leds elements in our array
    digitalWrite(PinLeds[i], HIGH);     // And set each of the PinLeds in HIGH level
    delay(150);                                      // Wait 150 millis seconds, and back to structure For   
  }
  for (int i = 0; i < Leds; i++) {            // Go through each of the Leds elements in our array
    digitalWrite(PinLeds[i], LOW);      // And set each of the PinLeds in LOW level
    delay(150);                                      // Wait 150 millis seconds, and back to structure For 
  }
}
//------------------------------------- www.elcircuits.com --------------------------------------------

Using the Array Data Structure technique, we could practically save half a line of the previous code, that's really cool, right?

After building the circuit, connect your Arduino board to your computer, run the Arduino software (IDE), copy the code below and paste it into your Arduino IDE. But first let us understand the code line by line.
  • In Line 3, we declared  the number of LEDs in the circuit.

  • In Line 4, We are using an Array to index each pin of the LEDs in the corresponding Arduino Ports.
1
2
3
4
5
...
// Arduino: Lesson 9 - LED Sequencing using Array Data Structure

const int Leds =  5;                                      //Number of LEDs in the circuit
const int PinLeds[Leds] = {2, 3, 4, 5, 6};   //LEDs connected to pins 2 to 6

//------------------------------------- www.elcircuits.com --------------------------------------------
  • In Line 6we enter the void setup() function. This function is read only once when the Arduino is started.

  • In Line 7, we enter in the FOR structure control, to access each Leds element.

  • in Line 8, we set each PinLeds as OUTPUT, through each elements in ou array.
1
...
6
7
8
9
10
...
// Arduino: Lesson 9 - LED Sequencing using Array Data Structure

void setup() {                 // This function is called once when the program starts
  for (int i = 0; i < Leds; i++) {            // Go through each of the elements in our array
    pinMode(PinLeds[i], OUTPUT);    // And set them as OUTPUT
  }
}
//------------------------------------- www.elcircuits.com --------------------------------------------
  • Line 11, we enter in the loop() function does precisely what its name suggests, and loops consecutively.

  • In Line 12, we enter in the For structure control, to go through each of the Leds elements in our array.

  • In Line 13, we continue in the For structure control, and set each of the PinLeds in HIGH level, turn on Led by Led.

  • In Line 14, we enter in the delay function, to wait 150 millis seconds, and back to structure For while it is true.

  • In Line 16, we enter in the For structure control, to go through each of the Leds elements in our array.

  • In Line 17, we continue in the For structure control, and set each of the PinLeds in LOW level, turn off Led by Led.

  • In Line 18, we enter in the delay function, to wait 150 millis seconds, and back to structure For while it is true.
1
...
11
12
13
14
15
16
17
18
19
20
21
// Arduino: Lesson 9 - LED Sequencing using Array Data Structure

void loop() { // The loop function runs over and over again as long as the Arduino has power.
  for (int i = 0; i < Leds; i++) {            // Go through each of the Leds elements in our array
    digitalWrite(PinLeds[i], HIGH);     // And set each of the PinLeds in HIGH level
    delay(150);                                      // Wait 150 millis seconds, and back to structure For   
  }
  for (int i = 0; i < Leds; i++) {            // Go through each of the Leds elements in our array
    digitalWrite(PinLeds[i], LOW);      // And set each of the PinLeds in LOW level
    delay(150);                                      // Wait 150 millis seconds, and back to structure For 
  }
}
//------------------------------------- www.elcircuits.com --------------------------------------------
All ready! After you have assembled the entire circuit, and uploaded this code, what you should see is the sequence of LEDs turning on and off, giving the impression that the LEDs are moving forward.

Next Lesson

  • Arduino: Lesson 10 - How to Read Temperature and Humidity with Arduino, Using the DHT11 Sensor

Previous Lesson

If you have any questions, suggestions or corrections, please leave them in the comments and we will answer them soon.

Subscribe to our blog!!! Click here - elcircuits.com!!!

My Best Regards!!!

Sunday, October 17, 2021

Arduino: Lesson 8 - Using LDR Sensor and reading values on Serial Monitor


Fig. 1 - Using LDR Sensor and reading values on Serial Monitor

Welcome to Lesson 8 - Basic Arduino Course

In today's lesson, we will learn how to use an LDR sensor and read values on a Serial Monitor with Arduino. 

To measure light intensity, we will use the famous and widely used low-cost LDR (Light Dependent Resistor) sensor, to detect the intensity of light or darkness easily and cheaply.

LDR (Light Dependent Resistor) Sensor

LDR is a special type of resistor that passes higher voltage (low resistance) when light intensity is high and low voltage (high resistance) when darkness is low. 

With this method, we can use it for example in projects such as:

  • Lack of Light Alarm - Triggers an alarm when power is cut.
  • Brightness Control - Used to control the brightness of a recording or filming environment for example.
  • Contrast Control Screen - Often used on mobile phones to automatically lower or increase the brightness of the Display.
  • Emergency Light - Automatically turns on when Light is cut.
  • Ticket Counter - Also used to count people at the entrance of an establishment.
  • Invasion Alarm - Used to trigger an alarm when there is an invasion of the monitored establishment. 

In today's example, we will use this sensor to measure numerical resistance and read these values from the serial monitor.

To do this, we will use the Arduino analog Port A0. We can use any analog Port, in case of Arduino Uno there are 6 ports; A0 to A5.

Hardware Required

  • Arduino Board
  • LDR - Sensor Dependent Light
  • 100K ohms resistor - (Brown, black, yellow, gold)
  • Jumper Wires
  • Protoboard (optional)

The Circuit Connections

The circuit is very simple, we connect one leg of the LDR to positive 5V, and another leg to the 100K resistor in series with negative GND, and the same leg that takes the resistor and LDR, we connect to port A0, as shown in Figure 2 below.

Fig. 2 - Using LDR Sensor and reading values on Serial Monitor - tinkercad.com

We use a protoboard to facilitate the connections, but you can also connect the wires directly to the Arduino.

The Code

The analogReads() function, reads the value from the specified analog pin. Arduino boards contain a multichannel, 10-bit analog to digital converter. This means that it will map input voltages between 0 and the operating voltage(5V or 3.3V) into integer values between 0 and 1023

On an Arduino UNO, for example, this yields a resolution between readings of: 5 volts / 1024 units or, 0.0049 volts (4.9 mV) per unit

After building the circuit, connect your Arduino board to your computer, launch Arduino Software (IDE), copy the code below and paste it into your Arduino IDE. But first let us understand the code line by line. 

  • In Line 3, we declared sensorPin to select the analog input Pin A0 to connect the LDR.
  • In Line 4, we declared sensorValue as a variable to store the value coming from LDR sensor.

  • In Line 6we enter the void setup() function. This function is read only once when the Arduino is started.
  • In Line 7, we sets the serial port for communication, we will read the numeric value from LDR sensor. 
1
2
3
4
5
6
7
8
9
// Arduino Lesson 8 - Using LDR Sensor and reading values on Serial Monitor with Arduino

int sensorPin = A0;        // Select the Analog input pin for LDR
int sensorValue = 0;       // Variable to store the value coming from the sensor

void setup() {                // This function is called once when the program starts
 Serial.begin(9600);       // Sets Serial Port for communication with bounce rate in 9600
}
//------------------------------------- www.elcircuits.com --------------------------------------------
  • In Line 10, we enter in the loop() function does precisely what its name suggests, and loops consecutively.

  • In Line 11, the sensorValue variable, receives the value read from sensorPin, which is the analog input Pin, and stores the read values.

  • In Line 12, the Serial.println() function, prints the values from the variable sensorValue on the serial monitor screen.
1
...
10
11
12
13
14
// Arduino Lesson 8 - Using LDR Sensor and reading values on Serial Monitor with Arduino

void loop() { // The loop function runs over and over again as long as the Arduino has power.
sensorValue = analogRead(sensorPin);    // Read the value from the sensor
Serial.println(sensorValue);                      // Prints the values coming from the sensor on the Serial Monitor
}
//------------------------------------- www.elcircuits.com --------------------------------------------
Below you can see the full code, which we can be copying and pasting into your Arduino IDE, and uploading to Arduino.

The complete code is showed in the sketch below!

1
2
3
4
5
6
7
8
9
10
11
12
13
14
// Arduino Lesson 8 - Using LDR Sensor and reading values on Serial Monitor with Arduino

int sensorPin = A0;        // Select the Analog input pin for LDR
int sensorValue = 0;       // Variable to store the value coming from the sensor

void setup() {               // This function is called once when the program starts  
 Serial.begin(9600);      // Sets Serial Port for communication with bounce rate in 9600
}

void loop() { // The loop function runs over and over again as long as the Arduino has power.
sensorValue = analogRead(sensorPin);     // Read the value from the sensor
Serial.println(sensorValue);                       // Prints the values coming from the sensor on the Serial Monitor
}
//------------------------------------- www.elcircuits.com --------------------------------------------

All ready! After you have assembled the entire circuit, and uploaded this code, open the Serial Monitor and what you will see is the numerical value of the LDR.

When you approach the hands of the LDR inhibiting the Light, the number will drop to the minimum possible, it will depend on the LDR, and when you shine a light on the sensor, the number will go to the maximum of the sensor.
With that, the possibilities are immense, to work with this sensor.

Next Lesson

Previous Lesson

If you have any questions, suggestions or corrections, please leave them in the comments and we will answer them soon.

Subscribe to our blog!!! Click here - elcircuits.com!!!

My Best Regards!!!

Sunday, October 10, 2021

Arduino: Lesson 7 - Controlling LED Through Serial Monitor with Arduino


Fig 1 - Arduino: Lesson 7 - Controlling LED Through Serial Monitor with Arduino

Welcome to Lesson 7 - Basic Arduino Course

In today's lesson we will learn how to control the state of a LED via the Serial Monitor using the Arduino IDE.

We will use the Serial.readString() function which will cause the Arduino to interpret the sentence you have entered into the serial monitor, e.g. "Turn on the led". If you press ENTER Key in you computer, the LED will be turned on, if you want to turn off the LED just write the message "Turn off the LED".

With this method we can use it in different projects such as:

  • Load activation - Turns one or more loads on or off using commands.
  • Motor Speed Control - Use Serial Monitor to send the speed at which a PWM motor should run.
  • Calibrate a sensor's constant - We can create software to change a sensor's constant to a specified value if needed.

In our example today, we are using the serial monitor to trigger a LED, but you can also use a relay module to drive a motor, for example.

To do this, we will use the D9 digital port on Arduino. We can use any digital port we want. Just change the port you want to use in the declaration or the one that is available on your Arduino.

Required hardware

  • Arduino board
  • LED - Light Emitter Diode 220 Ohm Resistor - (red, red, brown, gold)
  • Jumper wires
  • Protoboard (optional)

The circuit

The circuit is quite simple. We connect a LED in series with a 220 ohm resistor to limit the current in the LED as we learned in previous lessons, and we connect the 9-port of the Arduino UNO as shown in Figure 2 below.

Fig. 2 - Controlling LED Through Serial Monitor with Arduino - tinkercad.com

We use a protoboard to facilitate the connections, but you can also connect the wires directly to the Arduino.

The code

The Serial.readString() function reads characters from the serial buffer and moves them to a given string.

In our example, we want to do something very simple, which is to turn on and off a LED using the command from Serial Monitor.

After building the circuit, connect your Arduino board to your computer, run the Arduino software (IDE), copy the code below and paste it into your Arduino IDE.

But first let us understand the code line by line.

  • In Line 3, we declared ledPin to digital Pin 9 where we connect the LED to the digital Pin 9
  • In Line 4, we declared the DataIn String that will receive the Serial Monitor Commands
  • In Line 6we enter the void setup() function. This function is read only once when the Arduino is started.
  • In Line 7, we begin serial communication by declaring the Serial.begin() function. At 115200 bits of data per second, this is the speed at which your computer will communicate with your Arduino Serial.
  • In Line 8, we define Port 9 as the output, using the pinMode(); function;
1
2
3
4
5
6
7
8
9
// Arduino: Lesson 7 - Controlling LED Through Serial Monitor with Arduino

int ledPin = 9;                                    // LED connected to digital pin 9
String DataIn;                                    // String that will receive the commands

void setup() {                                    // This function is called once when the program starts
Serial.begin(115200);                       // Begin the Serial Monitor with bounce rate in 115200
pinMode(ledPin, OUTPUT);            // Set the digital pin as output:
}
//------------------------------------- www.elcircuits.com --------------------------------------------
  • In Line 11, we enter in the void loop() function does precisely what its name suggests, and loops consecutively.
  • In Line 12, we enter in a if conditional, for to check if the Serial Monitor is available, if yes we call the next function.
  • In Line 13, we call the Serial.readString() function to read the characters from the Serial Monitor and send them to the String DataIn.

  • In Line 15we enter the if conditional, in this case to compare if the characters are the same as written in the Serial Monitor, in our example "turn led on", if yes...
  • In Line 16, we enter the digitalWrite function, command activates ledPin to HIGH level, it means that it goes from 0V to 5V, which turn the LED On.

  • In Line 17, we enter the if conditional, that compare if the characters are the same as written in the Serial Monitor, in our example "turn led off", if yes...
  • In Line 18, we enter the digitalWrite function, command desable ledPin to LOW level, it means that it goes from 5V to 0V, which turn the LED Off.
1
...
11
12
13
14
15
16
17
18
19
20
21
// Arduino: Lesson 7 - Controlling LED Through Serial Monitor with Arduino

void loop() { // The loop function runs over and over again as long as the Arduino has power
  if (Serial.available()) {                   // Check if there is any data on the serial monitor
    DataIn = Serial.readString();       // String DataIn receives the data typed in the Serial Monitor
  }
 if (DataIn == "turn led on") {          // Check if the received String is equal to "turn led on"  
    digitalWrite(ledPin, HIGH);         // If yes, the function digitalWrite turn Led ON
  } if (DataIn == "turn led off") {     // Check if the received String is equal to "turn led off" 
    digitalWrite(ledPin, LOW);         // If yes, the function digitalWrite turn Led OFF 
  }
}
//------------------------------------- www.elcircuits.com --------------------------------------------

B
elow you can see the full code, which we can be copying and pasting into your Arduino IDE, and uploading to Arduino.

The complete code is showed in the sketch below!

1
2
3
4
5
6
7
8
9
10
11
12
13
14
15
16
17
18
19
20
21
// Arduino: Lesson 7 - Controlling LED Through Serial Monitor with Arduino

int ledPin = 9;                                    // LED connected to digital pin 9
String DataIn;                                    // String that will receive the commands

void setup() {                                    // This function is called once when the program starts  
Serial.begin(115200);                       //Begin the Serial Monitor with bounce rate in 115200
pinMode(ledPin, OUTPUT);            // Set the digital pin as output:
}

void loop() { // The loop function runs over and over again as long as the Arduino has power
  if (Serial.available()) {                   // Check if there is any data on the serial monitor
    DataIn = Serial.readString();       // String DataIn receives the data typed in the Serial Monitor
  }
 if (DataIn == "turn led on") {          // Check if the received String is equal to "turn led on"  
    digitalWrite(ledPin, HIGH);         // If yes, the function digitalWrite turn Led ON
  } if (DataIn == "turn led off") {     // Check if the received String is equal to "turn led off" 
    digitalWrite(ledPin, LOW);         // If yes, the function digitalWrite turn Led OFF 
  }
}
//------------------------------------- www.elcircuits.com --------------------------------------------

Next Lesson

Previous Lesson

If you have any questions, suggestions or corrections, please leave them in the comments and we will answer them soon.

Subscribe to our blog!!! Click here - elcircuits.com!!!

My Best Regards!!!