 |
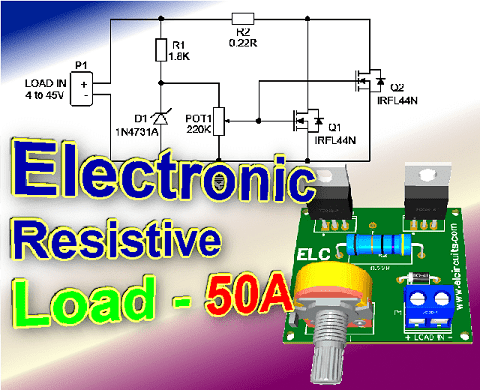
| Fig. 1 - Electronic Resistive Load - 50A Power Supply Test with PCB |
Efficient Power Testing: Constructing a 50A Electronic Resistive Load with PCB for Power Supply Evaluation
You know that moment when you have a power supply to fix, you do the service and the supply works, but you don't know if it will support a large load?
I came across a problem like this, and I decided to make my own resistive electronic load, and share it with our subscribers, and for you who visit us, welcome!
🧷 The circuit Electronic Resistive Load
The circuit is quite simple, with few components and easy to assemble, based on two power transistors Mosfet N-channel, IRL44N connected in parallel.
The circuit is capable of withstanding an initial load “for low voltage sources 4V” of 40A, and for voltage above 5V, the current is 50A, supporting voltages up to 45V.
This voltage is received and transformed into heat, and the consumption current is controlled by means of a potentiometer.
📖 Transistor Description
Fifth Generation HEXFETs from International Rectifier utilize advanced processing techniques to achieve the lowest possible on-resistance per silicon area.
This benefit, combined with the fast switching speed and ruggedized device design that HEXFET Power MOSFETs are well known for, provides the designer with an extremely efficient device for use in a wide variety of applications.
The TO-220 package is universally preferred for all commercial-industrial applications at power dissipation levels to approximately 50 watts.
The low thermal resistance and low package cost of the TO-220 contribute to its wide acceptance throughout the industry.
🤔 How it works
When turning on the electronic resistive load, a current passes through the Drain and Source taps, and this current flow is controlled by the Mosfet Gate.
For this control to happen properly, a stabilized voltage is needed at that point, which is done through the resistor R1, current limiting, in series with the zener diode, which stabilizes the voltage at the Gate.
This stabilized voltage ensures that the current not be variable when the input voltage undergoes some variation.
This stabilized voltage point is controlled by the potentiometer P1, which adjusts the voltage at the Gate of the Mosfet according to the required current.
It is worth remembering that the transistor used is a logic-type IRL44N Mosfet, not the well-known IRF44N.
They differ in relation to the gate voltage, as the logic-type Mosfet triggers the Gate with low Vgs voltages from 4V, and the IRF44N does not work with such low voltages, the minimum Vgs is 7V.
🔌 The Circuit
The schematic diagram of the Electronic Resistive Load - Power Supply Test!, is shown in Figure 2 below, it is a simple circuit to assemble, there are few external components to solder, however it is a circuit of great quality and stability.
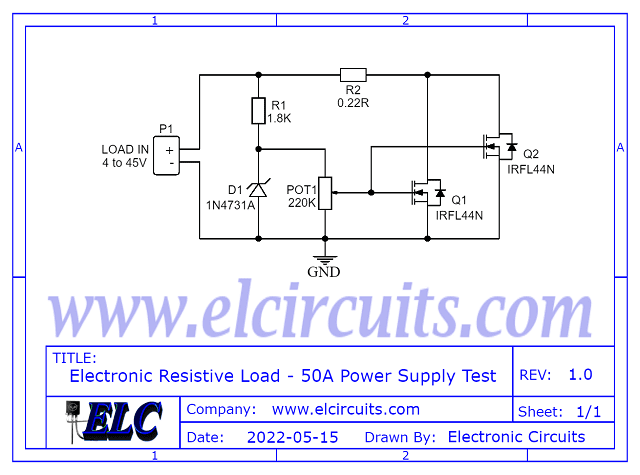 |
| Fig. 2 - Electronic Resistive Load - 50A Power Supply Test |
🧮 Component List
- Semiconductors
- Q1, Q2 .... IRL44N Mosfet Transistor
- D1 ........... 1N4731 1W Zener Diode
- Resistors
- R1 ........ 1.8KΩ resistor (brown, grey, red, gold)
- R2 ........ 0.22Ω resistor (red, red, silver, gold)
- POT1 ... 220KΩ Potentiometer
- Miscellaneous
- P1 .... Screw Terminal Type 5mm 2-Pin Connector
- Others .... PCB, Heat Sink, tin, wires, etc.
🖨️ The PCB - Files to Download
In Figure 3, we provide the PCB - Printed Circuit Board, in GERBER, PDF and PNG files. These files are available for free download, on the MEGA server, in a direct link, without any bypass.
All to make it easier for you to do a more optimized assembly, either at home, or with a company that prints the board. You can download the files in the Download option below.
 |
| Fig. 3 - PCB Electronic Resistive Load - 50A Power Supply Test |
📥 Files to download, Direct Link:
👋 I hope you enjoyed it!!!
If you have any questions, suggestions or corrections, please leave them in the comments and we will answer them soon.
🙏 Subscribe to our blog!!! Click here - elcircuits.com!!!
My Best Regards!!!
If you have any questions, suggestions or corrections, please leave them in the comments and we will answer them soon.
🙏 Subscribe to our blog!!! Click here - elcircuits.com!!!
My Best Regards!!!