Showing posts with label Amplifier. Show all posts

Wednesday, April 6, 2022

14V 4 Channel 200W MOSFET Quad Bridge Power Amplifier using TDA7850 with PCB

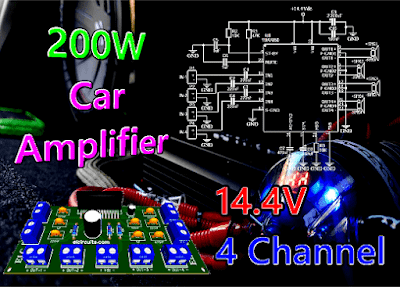
Fig. 1 - 14V 4 Channel 200W MOSFET Quad Bridge Power Amplifier using TDA7850 with PCB

Unleash Power and Sound with a 14V 4-Channel 200W MOSFET Quad Bridge Amplifier using TDA7850 and PCB

This is a 14V 4 Channel 200W MOSFET Quad Bridge Power Amplifier, it uses an TDA7850 Integrated Circuits, in Quad Bridge Mode to drive four power speakers.

The circuit provides a total output power of 200W, and this with good sound quality, powered from a unipolar 14V power supply.

The Amplifier responds very well to all audible frequency ranges, and has a minimalist, compact design, which makes this amplifier a good choice for an unprecedented range of application. 

IC Description

The TDA7850 is a breakthrough MOSFET technology Class AB audio power amplifier in Flexiwatt 25 package designed for high power car radio. 

The fully complementary P-Channel / N-Channel output structure allows a rail to rail output voltage swing which, combined with high output current and minimized saturation losses sets new power references in the car-radio field, with unparalleled distortion performances. The TDA7850 integrates a DC offset detector.

You might also be interested in:

IC Features

  • High output power capability:
    • 4 x 50W / 4Ω max.
    • 4 x 30W / 4Ω @ 14.4 V, 1 kHz, 10 %
    • 4 x 80W / 2Ω max.
    • 4 x 55W / 2Ω @ 14.4V, 1 kHz, 10 %
  • MOSFET output power stage
  • Excellent 2Ω driving capability
  • Hi-Fi class distortion
  • Low output noise
  • ST-BY function
  • Mute function
  • Auto mute at min. supply voltage detection
  • Low external component count:
    • Internally fixed gain (26 dB)
    • No external compensation
    • No bootstrap capacitors
  • On board 0.35 A high side driver

The Schematic Circuit

In Figure 2 below, we have available the schematic diagram of the 14V 4 Channel 200W MOSFET power amplifier circuit, this circuit is quite simple to assemble.

As we can see there are very few external components, making the circuit very simple to assemble, even for a technician or hobbyist with little experience in electronics can assemble it without much difficulty. 

Fig. 2 - Diagram 14V 4 Channel 200W MOSFET Quad Bridge Power Amplifier using TDA7850

It is important to remember to be careful when assembling the circuit, as simple as the circuit is. We must be careful not to invert any components, such as capacitors, or invert the input voltage of the circuit, because the integrated circuit or other components can be damaged easily.

Components List

  • Semiconductors
    • U1 ............ TDA7850 Integrated Circuit 

  • Resistors
    • R1 ............ 47KΩ Resistor (yellow, violet, orange, gold)
    • R2, R3 ..... 10K resistor (brown, black, orange, gold)

  • Capacitors
    • C1 to C4 ... 220nF Ceramic/Polyester Capacitor
    • C5, C6 ...... 1μF Ceramic/Polyester Capacitor
    • C7 ............. 470nF Ceramic/Polyester Capacitor
    • C8 ............. 47μF / 25V Electrolytic Capacitor
    • C9 ............. 2.200μF / 25V Electrolytic Capacitor
    • C10 ........... 100nF Ceramic/Polyester Capacitor

  • Miscellaneous
    • P1 to P9 .... Screw Terminal Type 5mm 2-Pin Connector
    • Other ........ PCB, Wires, Speaker, etc.

    Power Supply

    This amplifier is powered by unipolar source, with direct current, the maximum current required by the circuit is approximately 15 Amperes.

    And you can connect it directly to a car battery, or a motorcycle battery, or a no-break battery, or a bench power supply... 

    The power will be according to the power supply, and as already shown in the IC features above, to have 4 outputs of 50W we have to supply the circuit with 14.4V

    Printed Circuit Board

    In Figure 3, we provide the PCB - Printed Circuit Board, in GERBER, PDF and PNG files. These files are available for free download, on the MEGA server, in a direct link, without any bypass. 

    All to make it easier for you to do a more optimized assembly, either at home, or with a company that prints the board. You can download the files in the Download option below.

    Fig. 3 - PCB 14V 4 Channel 200W MOSFET Quad Bridge Power Amplifier using TDA7850

    Files to Download, Direct Link:

    Click on the link beside: GERBER, PDF and PNG files

    I hope you enjoyed it!!!

    If you have any questions, suggestions or corrections, please leave them in the comments and we will answer them soon.

    Subscribe to our blog!!! Click here - elcircuits.com!!!

    My Best Regards!!!

    Friday, April 1, 2022

    140W Class AB Amplifier using MJL4281A and MJL4302A transistors with PCB

    Fig. 1 - 140W Class AB Amplifier using MJL4281A and MJL4302A transistors with PCB

    Discover High-Fidelity Sound: Build a 140W Class AB Amplifier with MJL4281A and MJL4302A Transistors along with PCB

    This is a simple 140W Class AB amplifier using MJL4281A and MJL4302A transistors, which stands out for its simplicity, quality, and is a moderate amplifier to build.

    You can be making two of these boards, to be able to work with two outputs, in stereo, and make an amplifier with total power of 280W RMS.

    This amplifier works with a simple power supply, that is, a unipolar, non-symmetric power supply.
     
    This amplifier circuit can be used in almost any type of application that requires a simple amplifier, with great performance, low noise and low distortion, and good sound quality.

    It uses 2 output power transistors, NPN transistor MJL4281, and PNP transistor MJL4302, forming a pair of complementary transistors.

    You might also be interested in:

    The Power Transistors

    The MJL4281A and MJL4302A transistors are power transistors designed for high power audio, they have a collector-emitter sustaining voltage of 350 V.

    It's high gain – 80 to 240, with the hFE = 50 (min) 8A collector current, and a low harmonic distortion, which makes a transistor excellent for high power operation and audio quality.

    The Circuit

    This circuit has a moderate complexity, it is not recommended for those who have no experience in electronics and in the assembly of amplifier circuits.

    You should have minimum knowledge in an intermediate to advanced level to assemble this type of power amplifier.

    The schematic diagram of the complete circuit, shown in Figure 2 below, is a very robust amplifier, with great sound quality and very stable, responding very well at all audible frequencies, with little attenuation in the 20Hz to 20Khz hearing frequency range.

    Fig. 2 - Schematic Diagram 140W Class AB Amplifier using MJL4281A and MJL4302A transistors

    Power supply

    The power supply is symmetrical, with a voltage of +45V | 0V | -45V, and direct current, with at least 6 Amps of current. For continuous use, we recommend 4A, especially if used in a subwoofer.

    In Figure 3 below, we have a suggestion for a power supply that we use in our projects. In this article, besides having the schematic diagram with the Printed Circuit Board, you will understand how to easily calculate your own Power Supply, with the desired voltage.

    You can in the link below:

    Fig. 3 - Symmetrical Power Supply for Power Amplifiers

    Components List

    • Semiconductor
      • Q1, Q2, Q3 .... 2N5551 NPN Transistor
      • Q4, Q6 ........... BD139 NPN Transistor
      • Q5, Q7 ........... BD140 PNP Transistor
      • Q8 .................. MJL4302A NPN Transistor
      • Q9 .................. MJL4281A NPN Transistor
      • LED1 ............. Light Emitter Diode (general use

    • Resistor
      • R1, R3 ........... 2K2Ω resistor (red, red, red, gold
      • R2, R4, R8 ..... 22KΩ resistor (red, red, orange, gold)
      • R5, R6 ........... 560Ω resistor (green, blue, brown, gold)
      • R7 .................. 1K2Ω resistor (brown, red, red, gold)
      • R9 .................. 1KΩ resistor (brown, black, red, gold)
      • R10, R11 ....... 3K3Ω resistor (orange, orange, red, gold)
      • R12, R13 ....... 220Ω resistor (red, red, brown, gold)
      • R14, R15 ....... 0.22Ω / 5W resistor (red, red, silver, gold)
      • R16 ................ 10Ω / 1W resistor (brown, black, black, gold
      • RP1 ................ 2K Potentiometer
    • Capacitor
      • C1 .................. 2.2uF / 25V electrolytic capacitor 
      • C2 .................. 330pF ceramic, polyester capacitor
      • C3, C5 ........... 100uF / 65V electrolytic capacitor 
      • C4, C6, C7 .... 100nF ceramic, polyester capacitor

    • Miscellaneous 
      • P1, P2 ............ Screw Terminal Type 5mm 2-Pin Connector
      • P3 .................. Screw Terminal Type 5mm 3-Pin Connector
      • Others ............ PCB, tin, wires, heat sink, soldering Iron, etc.

    Printed Circuit Board - Download

    We are offering the PCB – Printed Circuit Board, in GERBER, PDF and PNG files, for you who want to do the most optimized assembly, either at home.

    If you prefer in a company that develops the board, you can is downloading and make the files in the Download option below.

    Fig. 3 - PCB - 140W Class AB Amplifier using MJL4281A and MJL4302A transistors

    Files to Download, Direct Link:

    Click on the link beside: GERBER, PDF and PNG files

    I hope you enjoyed it!!!

    If you have any questions, suggestions or corrections, please leave them in the comments and we will answer them soon.

    Subscribe to our blog!!! Click here - elcircuits.com!!!

    My Best Regards!!!

    Wednesday, February 23, 2022

    160W High Fidelity Amplifier using Mosfet 2SK1058 and 2SJ162 with PCB

    Fig. 1- 160W High Fidelity Amplifier using Mosfet 2SK1058 and 2SJ162 with PCB

    This is a High Fidelity power amplifier, which uses 2 pairs of complementary MOSFETs output transistors, 2SK1058 and 2SJ162, which gives us a 160W power output. 

    The circuit is simple to assemble, assuming you have advanced knowledge in electronics, you will be able to assemble this circuit without too much difficulty.

    Basic operation of the circuit

    This amplifier has a few many steps, and we could break down each component, but it would certainly be too long, so let's explain the main stage of the amplifier process. 

    The 160W High Fidelity Amplifier circuit diagram is shown in Figure 2 below. It uses 4 output Mosfet power transistors, 2 transistors for the positive cycle and 2 transistors for the negative cycle.
    Fig. 2 - Schematic Circuits 160W High Fidelity Amplifier using Mosfet 2SK1058 and 2SJ162

    We will start with first Stage: 

    It is formed by a pair of MPSA56 PNP transistors, they form the input of the differential amplifier. 
    The main characteristic is to amplify the difference of the input signals without amplifying the common mode signal.

    In the second stage:

    We have two pairs of transistors, 2 NPN BD139 transistors and 2 PNP TIP140 transistors, they constitute a differential current source pair formed by the BD139 transistors pair. And with a current mirror formed by the BD140 transistors pair, in Cascade mode creating a telescopic amplifier stage.

    In the third stage:

    It is formed by the 4 Output MOSFETs transistors, two N-channel type transistors 2SK1058 and other two P-channel type transistors 2SJ162. They receive the signal from stage 2 which is a module in Cascade, as already explained, and deliver to the output load, formed by the speaker.

    The output transistors should be equipped with a Heat Sink, and should be electrically separated with thermal insulators.

    Power Supply

    The power supply is a symmetrical source, +Vdc GND -Vdc, and must contain a current capable of supporting the total power of the Amplifier.

    If the circuit is used in MONO mode "One channel", the recommended current is 4 Amperes. If a STEREO version "Two channels" is used, the current should be doubled to 8 Amperes.

    The amplifier work voltage is ±45Vdc SYMMETRICAL, to be used with an output load between 4 to 8 ohms.

    In Figure 3 below, we have a suggestion for a power supply that we use in our projects. In this article, besides having the schematic diagram with the Printed Circuit Board, you will understand how to easily calculate your own Power Supply, with the desired voltage.

    You can in the link below:

    Fig. 3 - Symmetrical Power Supply for Power Amplifiers

    Components List

    • Semiconductors
      • Q1 .......................... MPSA56 PNP Transistor
      • Q3, Q4 ................... BD139 NPN Transistor
      • Q5, Q6 ................... BD140 PNP Transistor
      • Q7, Q8 ................... 2SK1058 N-Channel Mosfet Transistor
      • Q9, Q10 ................. 2SJ162 P-Channel Mosfet Transistor
      • D1, D2 ................... 1N4007 Diode

    • Resistor
      • R1, R2, R10 ................ 47KΩ (yellow, violet, orange, gold
      • R3, R4 ........................ 3K3Ω (orange, orange, red, gold)
      • R5 ............................... 1K2Ω  (brown, red, red, gold)
      • R6 ............................... 10KΩ  (brown, black, orange, gold)
      • R7, R8 ........................ 1KΩ (brown, black, red, gold)
      • R9 ............................... 2K2Ω (red, red, red, gold)
      • R11, R12, R13, R14 ... 47Ω (yellow, violet, black, gold)
      • R15, R16, R17, R18 ... 022Ω (red, red, silver, gold)
      • R19 ............................. 10Ω (brown, black, black, gold)
    • Capacitor
      • C1 ........................ 4.7uF / 65V Electrolytic Capacitor 
      • C2, C4, C5 ........... 470pF Ceramic Capacitor
      • C3 ........................ 47uF / 65V Electrolytic Capacitor 
      • C6 ........................ 100nF Ceramic Capacitor

    • Miscellaneous 
      • P1, P2 .......... 2-pin PCB soldering terminal blocks
      • P3 ................ 3-pin PCB soldering terminal blocks
      • Others ......... PCB, heat sink, power supply, wires, etc.


    We are offering the PCB - Printed Circuit Board, in GERBER, PDF and PNG files, for you who want to do the most optimized assembly, either at home.

    If you prefer in a company that develops the board, you can is downloading and make the files in the Download option below.

    Fig. 3 - PCB 160W High Fidelity Amplifier using Mosfet 2SK1058 and 2SJ162

    Files to download, Direct Link:


    If you have any questions, suggestions or corrections, please leave them in the comments and we will answer them soon.

    Subscribe to our blog!!! Click Here - elcircuits.com!!!

    My Best Regards!!!

    Wednesday, February 16, 2022

    Powerful Mini Audio Amplifier using only 5 Transistors with PCB

    Fig 1 -  Powerful Mini Audio Amplifier using only 5 Transistors with PCB

    This is a simple amplifier that uses only 5 transistors, and provides good power, by our tests, we get close to 90W, and amazingly enough, it has a very good sound given its ultra simplicity.

    The circuit is quite simple, and very easy to building, which makes it a great option for those who want to build an amplifier with good power and great cost, because it uses discrete components, cheap and easy to acquire.

    You might also be interested in:

    The Amplifier Circuit

    The amplifier circuit is very simple to assemble, as shown in Figure 2 just below, this amplifier is divided into three basic stages: 

    • The first is the pre-amplification stage: It is formed by a differential pair set of NPN 2N5551 transistors, they are working as differential pair, which gives a very good stability in the signal sent to the next stage.

    • The second is the driver stage: it is formed by the PNP TIP42 transistor, it is used as a current amplifier and serves to drive the output stage.

    • The third is the power stage: It is formed by a pair of differential power transistors, one is the NPN 2SC5200 and the other is the 2SA1943, they are in push-pull mode, configured to work in class AB, with base BIAS diodes.
    • Fig. 2 - Schematic diagram Powerful Mini Audio Amplifier using only 5 Transistors

    Note

    Place the power transistors on a heat-sink, because since you work with power, they will get hot, a small size radiator will help.

    For those who like loud sound, to really force the amplifier to the maximum, it is recommended to put the BIAS diodes in series, on the heat sink along with the transistors. This will cause the base voltage to be controlled according to the temperature of the transistors.

    Power Supply

    The power is supplied through a 24 VAC transformer, after rectification the supply will provide 35 VDCThe current to power this amplifier is at least 3A, for those mounting two of these to form a stereo pair, you should double the current to 6 Amps. 

    Component List

    • Semiconductor
      • Q1, Q2 .......... 2N5551 NPN Transistor 
      • Q3 ................. PNP BD140 Transistor
      • Q4 ................. 2SC5200 NPN Power complementary transistor
      • Q5 ................. 2SA1943 PNP Power complementary transistor
      • D1, D2, D3 ... 1N4007 Diode

    • Resistors
      • R1, R5 .......... 100K ohms Resistor - (brown, black, yellow, gold)
      • R2 ................. 6K8 ohms Resistor - (blue, gray, red, gold)
      • R3 ................. 620 ohms Resistor - (blue, red, brown, gold)
      • R4.................. 4K7 ohms Resistor - (yellow, violet, red, gold)
      • R6 ................. 1k5 ohms Resistor - (brown, green, red, gold)
      • R7, R8 ........... 0.22 ohms - 5W  Resistor - (red, red, silver, gold)
      • P1 .................. 10K ohm potentiometer

    • Capacitors
      • C1 ................ 2.2uF Polyester / Ceramic Capacitor
      • C2 ................ 47uF - 65V Electrolytic capacitor 

    • Miscellanies
      • P1 ................. Screw Terminal Type 5mm 2-Pin Connector
      • P2 ................. Screw Terminal Type 5mm 3-Pin Connector
      • J1 .................. Set of male connectors 2-Pin (Optional)
      • Other ............. PCB, Wires, Speaker, Heat Sink, etc.

    Printed Circuit Board

    In Figure 3, we provide the PCB - Printed Circuit Board, in GERBER, PDF and PNG files. These files are available for free download, on the MEGA server, in a direct link, without any bypass. 

    All to make it easier for you to do a more optimized assembly, either at home, or with a company that prints the board. You can download the files in the Download option below.

    Fig. 3 - PCB - Powerful Mini Audio Amplifier using only 5 Transistors

    Files to download, Direct Link:

    Click on the link beside: GERBER, PDF and PNG files

    If you have any questions, suggestions or corrections, please leave them in the comments and we will answer them soon.

    Subscribe to our blog!!! Click Here - elcircuits.com!!!

    My Best Regards!!!

    Tuesday, February 15, 2022

    High Performance 56W Audio Power Amplifier using LM3876 IC with PCB

    Fig. 1 - High Performance 56W Audio Power Amplifier using LM3876 IC with PCB

    This is a High Performance 56W Audio Power Amplifier, based on the LM3876 Integrated Circuit, with great sound quality, powered by a symmetrical power supply.

    The Amplifier responds very well in all audible frequency ranges from 20Hz to 20Khz, and has a minimalistic and very compact design, which makes this amplifier a good choice to be assembled with little difficulty.

    LM3876 Integrated Circuit Description

    The LM3876 is a high-performance audio power amplifier capable of delivering 56W of continuous average power to an load with 0.1% THD+N from 20Hz–20kHz.

    The performance of the LM3876, utilizing its Self Peak Instantaneous Temperature (°Ke) (SPiKe) protection circuitry, puts it in a class above discrete and hybrid amplifiers by providing an inherently, dynamically protected Safe Operating Area (SOA) SPiKe protection. 

    Means that these parts are completely safe-guarded at the output against overvoltage, under-voltage, overloads, including shorts to the supplies, thermal runaway, and instantaneous temperature peaks.

    The LM3876 maintains an excellent signal-to-noise ratio of greater than 95dB (min) with a typical low noise floor of 2.0μV. It exhibits extremely low THD+N values of 0.06% at the rated output into the rated load over the audio spectrum, and provides exceptional linearity with an IMD (SMPTE) typical rating of 0.004%.

    Feature

    • 56W Continuous Average Output Power into 8Ω
    • 100W Instantaneous Peak Output Power Capability
    • Signal-to-Noise Ratio ≥ 95 dB(Min)
    • An Input Mute Function
    • Output Protection from a Short to Ground or to the Supplies Via Internal Current Limiting Circuitry
    • Output Over-Voltage Protection against Transients from Inductive Loads
    • Supply Under-Voltage Protection, not Allowing Internal Biasing to Occur when |VEE| + |VCC| ≤ 12V, thus Eliminating Turn-On and Turn-Off Transients
    • 11-Lead TO-220 Package
    • Wide Supply Range 20V - 94V

    The Schematic Circuit

    In Figure 2 below we have components arrangement of the power amplifier circuit with the LM3876 IC, and as we can see, the difficulty is not extreme. 

    Since there are few external components, making the amplifier circuit very simple to assemble, and a technician or hobbyist with medium experience can assemble it without much difficulty. 

    Fig. 2 - Schematic Circuit High Performance 56W Audio Power Amplifier using LM3876 IC

    It is important to remember to be careful when assembling the circuit, not to invert any component such as capacitor diodes, or even when connecting the symmetrical voltage of the power supply. Not to invert the voltage poles, because the integrated circuit or other components can be damaged.

    The coil is formed is a 5uH coil, for those who are going to assemble it, you can assemble it with 10 turns of 18 AWG Wire with a 3/8" air core.

    Components List

    • Semiconductors
      • U1 .............. LM3876 Integrated Circuit

    • Resistors
      • R1, R5 ....... 1K resistor (brown, black, red, gold)
      • R2, R3 ....... 18K resistor (brown, gray, orange, gold)
      • R4 .............. 10K resistor (brown, black, orange, gold)
      • R6, R7 ....... 22K resistor (red, red, orange, gold)
      • R8 .............. 100Ω resistor (brown, black, brown, gold)
      • R9 .............. 10Ω / 1W resistor (brown, black, black, gold)
      • RP1 ............ 10K Potentiometer

    • Capacitors
      • C1 ................. 2.2μF Ceramic/Polyester Capacitor
      • C2 ................. 220pF Ceramic/Polyester Capacitor
      • C3 ................. 47 Ceramic/Polyester Capacitor
      • C4, C5 .......... 22μF / 65V Electrolytic Capacitor
      • C6, C7, C8 .... 0.1uF Ceramic/Polyester Capacitor
      • C9, C10 ......... 2.200uF / 65V Electrolytic Capacitor
      • L1 .................. Inductor 5uH *Ver Texto

    • Others
      • P1, P2 ............ Screw Terminal Type 5mm 2-Pin Connector
      • P3 .................. Screw Terminal Type 5mm 3-Pin Connector
      • J1 ....................Set of male connectors 2-Pin (Optional)
      • Other .............. PCB, Wires, Speaker, Heat Sink, etc.

    Power Supply

    Power is supplied through a 24 VAC transformer with center tape, i.e. [+VAC | GND | -VAC], after rectification the source will supply 35 VDC

    It is a standard power supply voltage for this amplifier to work with little heating and little distortion, as it works with a minimum of 18V and a maximum of 84V

    The current to power this amplifier is of at least 2A, and if it is going to using in stereo mode, two of these same ones, this current has to be doubled to 4 Amperes

    In Figure 3 below, we have a suggestion for a power supply that we use in our projects. In this article, besides having the schematic diagram with the Printed Circuit Board, you will understand how to easily calculate your own Power Supply, with the desired voltage.

    You can in the link below:

    Fig. 3 - Symmetrical Power Supply for Power Amplifiers

    Printed Circuit Board

    In Figure 3, we provide the PCB - Printed Circuit Board, in GERBER, PDF and PNG files. These files are available for free download, on the MEGA server, in a direct link, without any bypass. 

    All to make it easier for you to do a more optimized assembly, either at home, or with a company that prints the board. You can download the files in the Download option below.

    Fig. 4 - PCB - High Performance 56W Audio Power Amplifier using LM3876 IC

    Files to download, Direct Link:

    Click on the link beside: GERBER, PDF and PNG files

    If you have any questions, suggestions or corrections, please leave them in the comments and we will answer them soon.

    Subscribe to our blog!!! Click Here - elcircuits.com!!!

    My Best Regards!!!